The installation and setup guide of Nemesida WAF Cabinet module, which is intended to visualise and classify the information about attacks and identified vulnerabilities, as well as to manage the settings of Nemesida WAF and Nginx web server.
Before installing the Nemesida WAF Cabinet module, you must install and configure the Nemesida WAF API module and PostgreSQL.
Below is a brief guide to the commissioning of the local version of the Nemesida WAF Cabinet on servers running Linux. To install the module you must perform following steps:
1.Install and configure the PostgreSQL DBMS:
# apt install postgresql
Create a database, user and password to connect the Nemesida WAF Cabinet module:
# su - postgres -c "psql -c \"CREATE DATABASE cabinet;\""
# su - postgres -c "psql -c \"CREATE ROLE nw_cabinet PASSWORD 'YOUR_PASSWORD';\""
# su - postgres -c "psql -c \"GRANT ALL ON DATABASE waf TO nw_cabinet;\""
# su - postgres -c "psql -c \"ALTER ROLE nw_cabinet WITH LOGIN;\""
# su - postgres -c "psql cabinet -c \"GRANT ALL ON ALL TABLES IN SCHEMA public TO nw_cabinet;\""
# su - postgres -c "psql cabinet -c \"GRANT ALL ON ALL SEQUENCES IN SCHEMA public TO nw_cabinet;\""
# su - postgres -c "psql cabinet -c \"GRANT CREATE ON SCHEMA public TO nw_cabinet;\""
# setenforce 0
then bring the file /etc/selinux/config to the form:
# This file controls the state of SELinux on the system.
# SELINUX= can take one of these three values:
#     enforcing - SELinux security policy is enforced.
#     permissive - SELinux prints warnings instead of enforcing.
#     disabled - No SELinux policy is loaded.
SELINUX=disabled
# SELINUXTYPE= can take one of three two values:
#     targeted - Targeted processes are protected,
#     minimum - Modification of targeted policy. Only selected processes are protected.
#     mls - Multi Level Security protection.
SELINUXTYPE=targeted
Create a database, user and password to connect the Nemesida WAF Cabinet module:
# su - postgres -c "psql -c \"CREATE DATABASE cabinet;\""
# su - postgres -c "psql -c \"CREATE ROLE nw_cabinet PASSWORD 'YOUR_PASSWORD';\""
# su - postgres -c "psql -c \"GRANT ALL ON DATABASE waf TO nw_cabinet;\""
# su - postgres -c "psql -c \"ALTER ROLE nw_cabinet WITH LOGIN;\""
# su - postgres -c "psql cabinet -c \"GRANT ALL ON ALL TABLES IN SCHEMA public TO nw_cabinet;\""
# su - postgres -c "psql cabinet -c \"GRANT ALL ON ALL SEQUENCES IN SCHEMA public TO nw_cabinet;\""
# su - postgres -c "psql cabinet -c \"GRANT CREATE ON SCHEMA public TO nw_cabinet;\""
If the database is used on a separate server, then it is necessary to provide access to it. To do this, you need to make changes to the PostgreSQL configuration file pg_hba.conf.
Example:
# IPv4 local connections:
host    all             all             10.1.1.0/24            md5
2. Install the module:
Before installing the module, be sure to check access to the created database by connecting to it with the command:
psql -h <server_ip> -U nw_cabinet cabinet. When connecting, enter the user’s passwordnw_cabinet.
# apt install apt-transport-https gnupg2 curl
Install packages:
# apt update && apt upgrade
# apt install nginx python3 python3-venv python3-dev python3-reportbug python3-pip memcached libmemcached-dev postgresql-server-dev-all gettext libpcre3-dev pkg-config libcairo2-dev
# apt install nwaf-cabinet
During the installation of the module, the following PIP packages are additionally installed:
wheel uwsgi psycopg2-binary chardet django-debug-toolbar django guppy3 jsonref netaddr pillow pymemcache pympler python-memcached python-pcre pytz pyyaml reportlab requests schedule six sqlparse PyPDF2
# apt install apt-transport-https gnupg2 curl
# apt install nwaf-cabinet
During the installation of the module, the following PIP packages are additionally installed:
wheel uwsgi psycopg2-binary chardet django-debug-toolbar django guppy3 jsonref netaddr pillow pymemcache pympler python-memcached python-pcre pytz pyyaml reportlab requests schedule six sqlparse PyPDF2
# setenforce 0
then bring the file /etc/selinux/config to the form:
# This file controls the state of SELinux on the system.
# SELINUX= can take one of these three values:
#     enforcing - SELinux security policy is enforced.
#     permissive - SELinux prints warnings instead of enforcing.
#     disabled - No SELinux policy is loaded.
SELINUX=disabled
# SELINUXTYPE= can take one of three two values:
#     targeted - Targeted processes are protected,
#     minimum - Modification of targeted policy. Only selected processes are protected.
#     mls - Multi Level Security protection.
SELINUXTYPE=targeted
During the installation of the module, the following PIP packages are additionally installed:
wheel uwsgi psycopg2-binary chardet django-debug-toolbar django guppy3 jsonref netaddr pillow pymemcache pympler python-memcached python-pcre pytz pyyaml reportlab requests schedule six sqlparse PyPDF2
3. Make the necessary changes to the /var/www/app/cabinet/settings.py file:
4. Allow access:
When deploying the database locally:
– to the Memcached server 127.0.0.1:11211;
– to a PostgreSQL DBMS server 127.0.0.1:5432;
– to a server with Nemesida WAF API 127.0.0.1:8080.
When deploying the database on a separate server:
– to the Memcached server 127.0.0.1:11211;
– to the server with the PostgreSQL database <server_ip>:5432;
– to a server with Nemesida WAF API 127.0.0.1:8080.
5. In firewall settings allow the requests to 80 port (is set by default in the file /etc/nginx/conf.d/cabinet.conf).
6. Run the migration and set the administrator password:
# cd /var/www/app/ && . venv/bin/activate && python3 manage.py check_migrations && python3 manage.py migrate && python3 manage.py createsuperuser && deactivate
7. Activate the virtual host:
# mv /etc/nginx/conf.d/cabinet.conf.disabled /etc/nginx/conf.d/cabinet.conf
# nginx -t && service nginx reload
8. Restart the server and test the module:
# systemctl status nginx cabinet cabinet_ipinfo cabinet_attack_notification cabinet_cleaning_db cabinet_rule_update memcached
Information about errors in the work of the Nemesida WAF Cabinet is contained in the event logs of the module /var/log/uwsgi/cabinet/*.log.
For security reasons, it is recommended to restricted access to the web interface of the Nemesida WAF Cabinet module to a list of allowed IP addresses to prevent unauthorized users from managing the Nemesida WAF work processes.
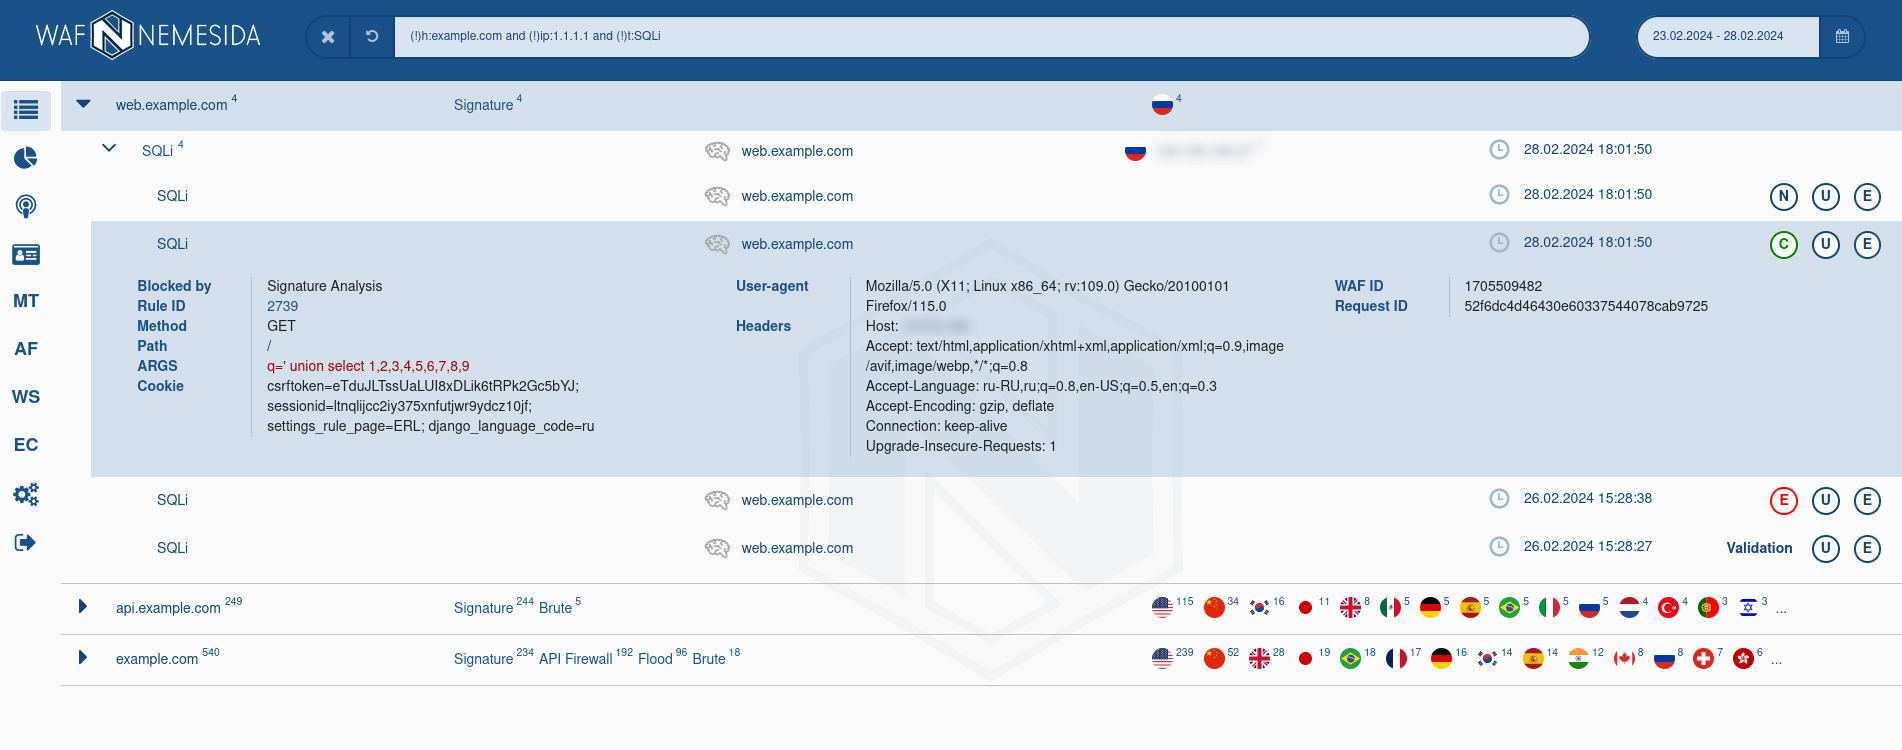
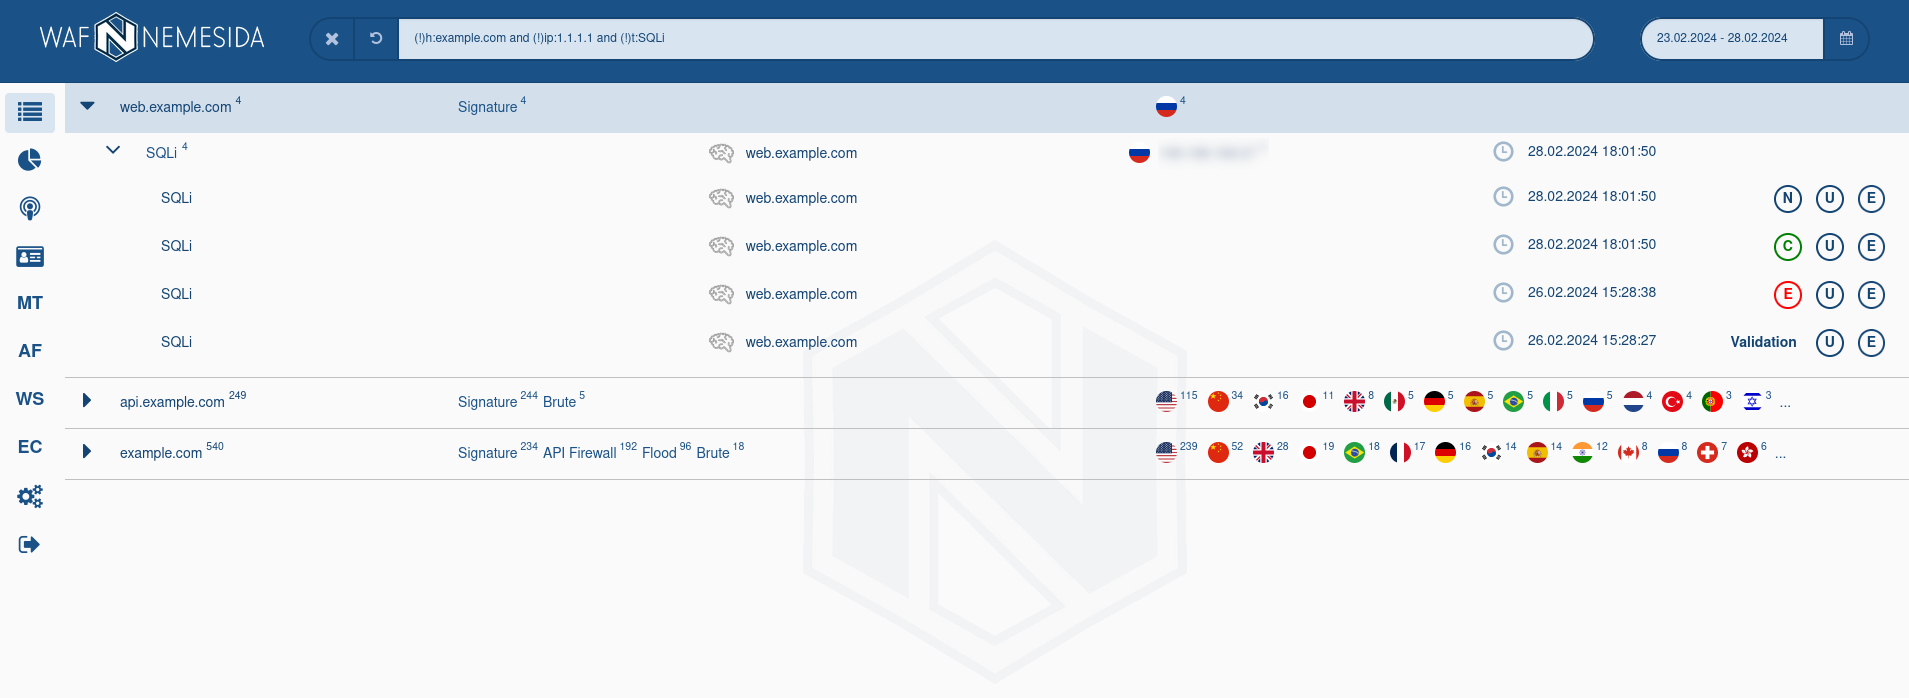
The Nemesida WAF Cabinet, available at YOUR_SERVER/waf/personal/, contains information on the work of the main (Nemesida WAF, Nemesida WAF Scanner, Nemesida WAF AI) and auxilary modules Nemesida WAF.
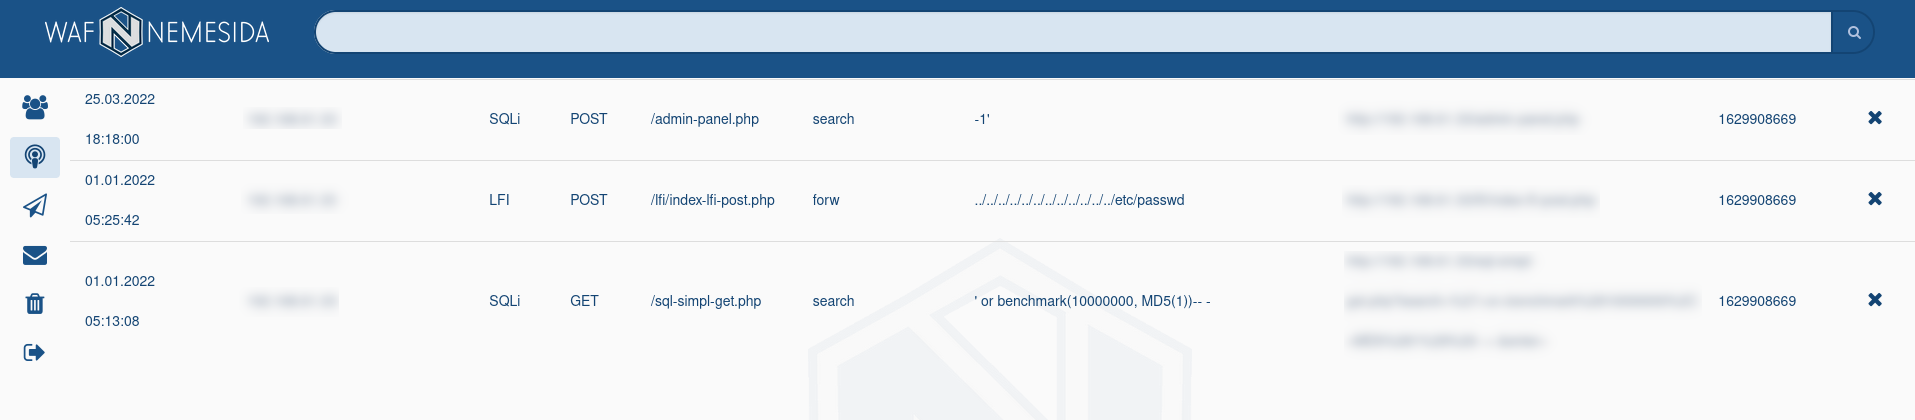
When you click on the icon ![]() a list of events is displayed.
a list of events is displayed.

The following icons are used as an indicator of the application of behavioral models:
 displays when machine learning module is not the reason of the request blocking (BT 2, 6, 7);
 displays when behavioral models are in the process of being retrained;
 displays when the reason of the request blocking is machine learning module (BT 3, 8).
More information about the reasons of the request blocking by Nemesida WAF module is available in corresponding section.
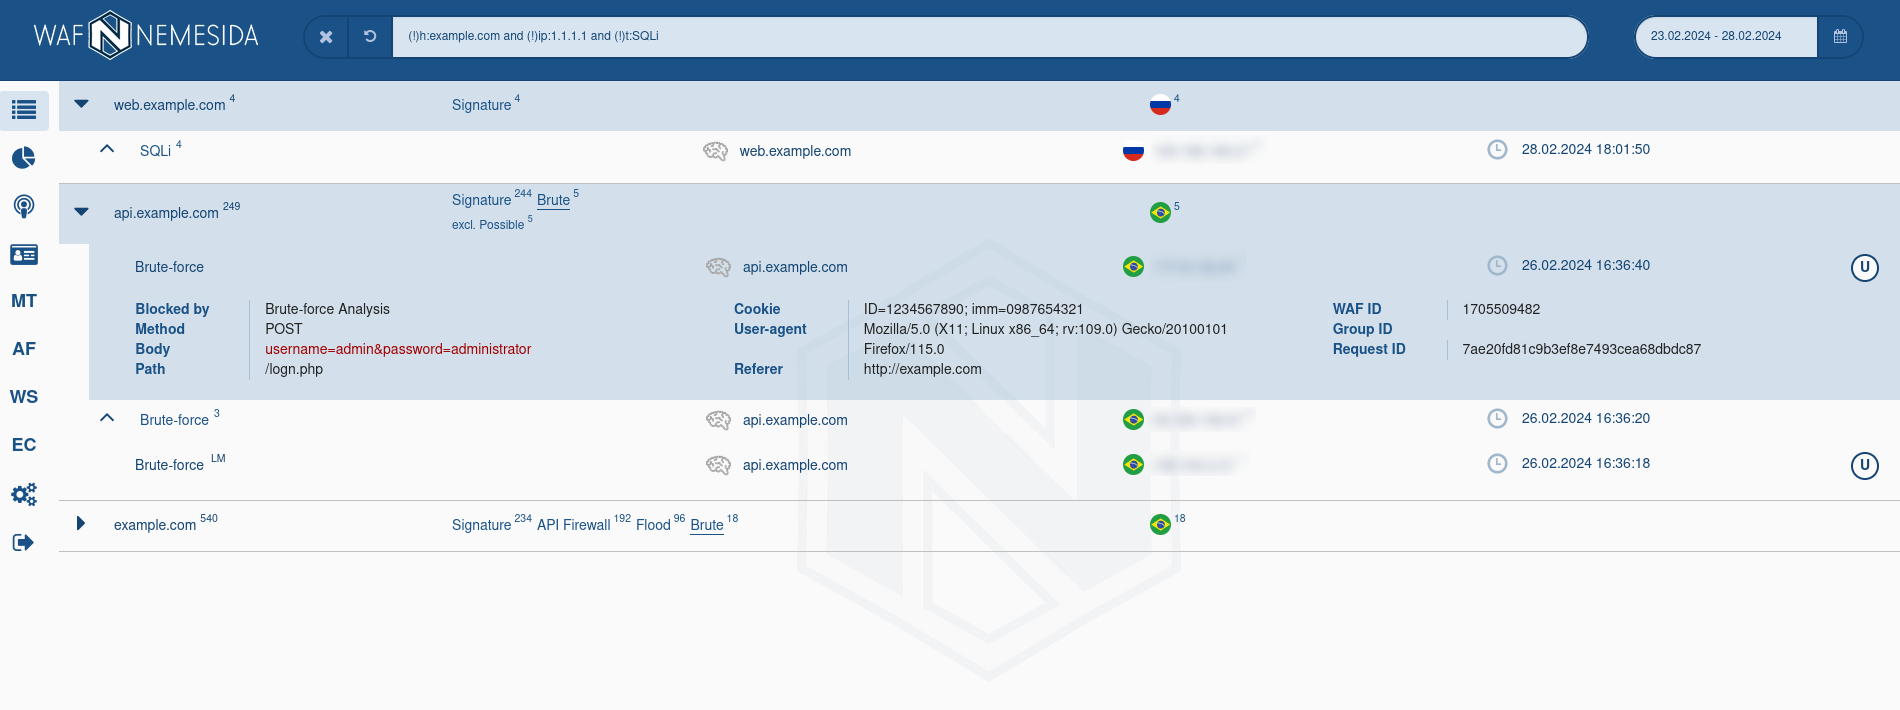
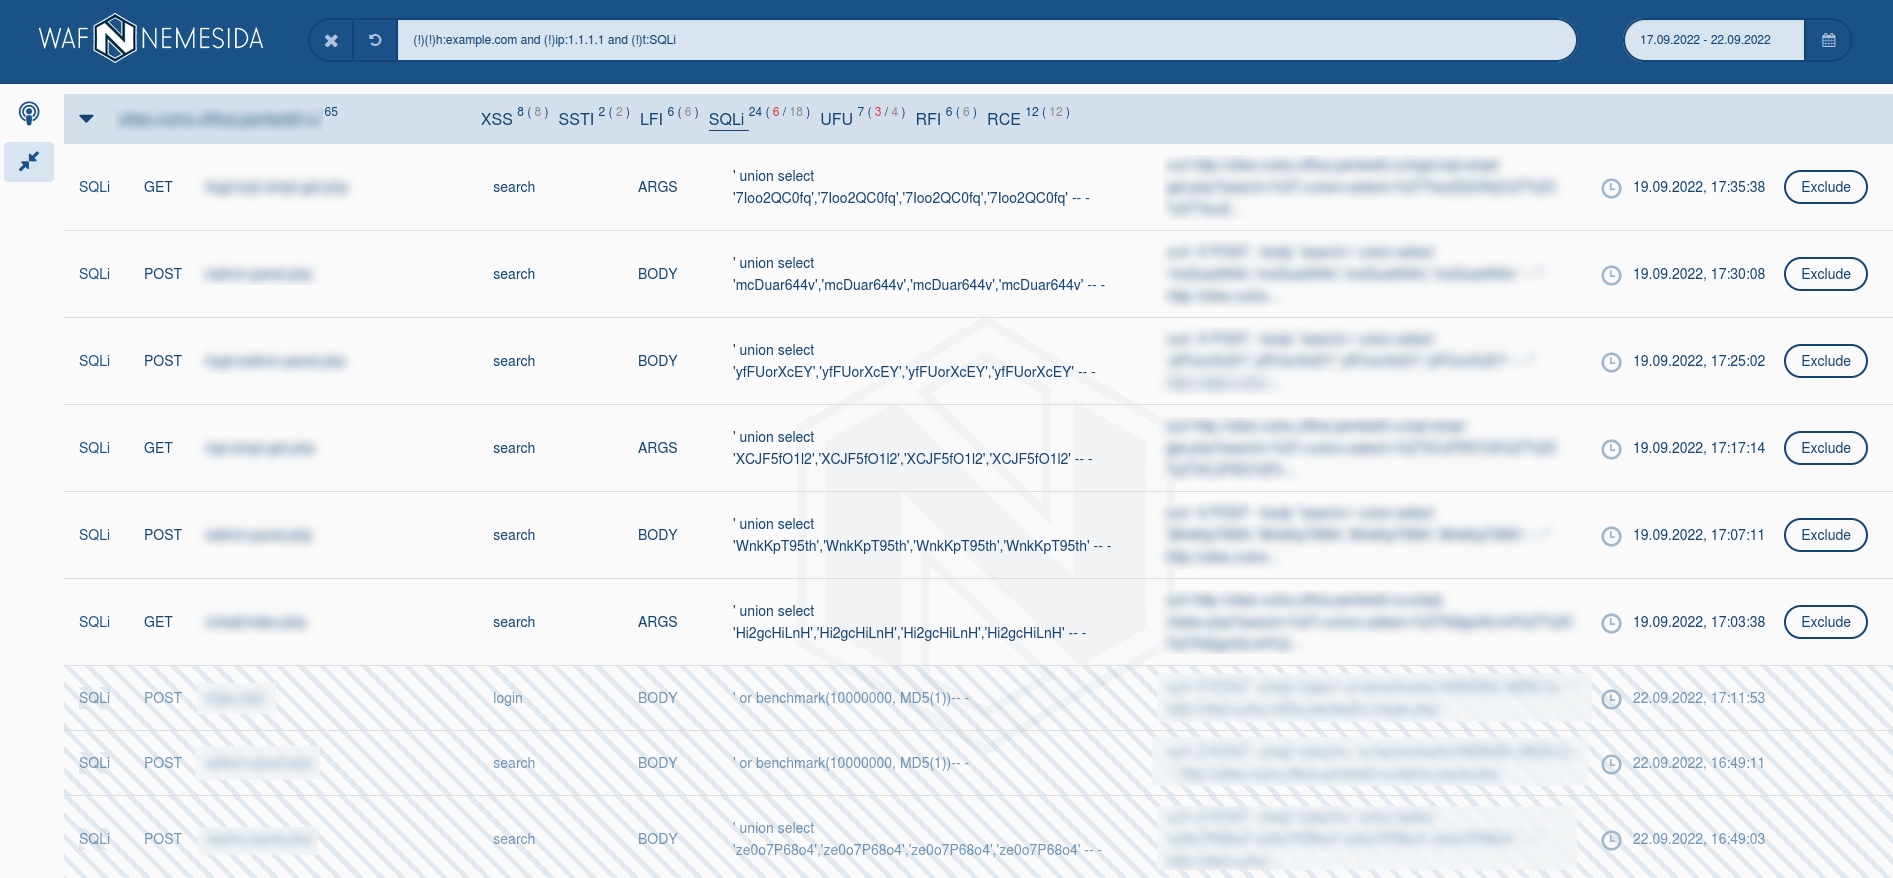
The search area and event selection for a specific period are available at the top of the page. On theSummary and Attack pages, you can search both in the normal mode (without specifying special parameters) and in the advanced mode using the following directives:
To limit the display of information in the search field, the logical operators «!» (exception) and «and» (association) are available.
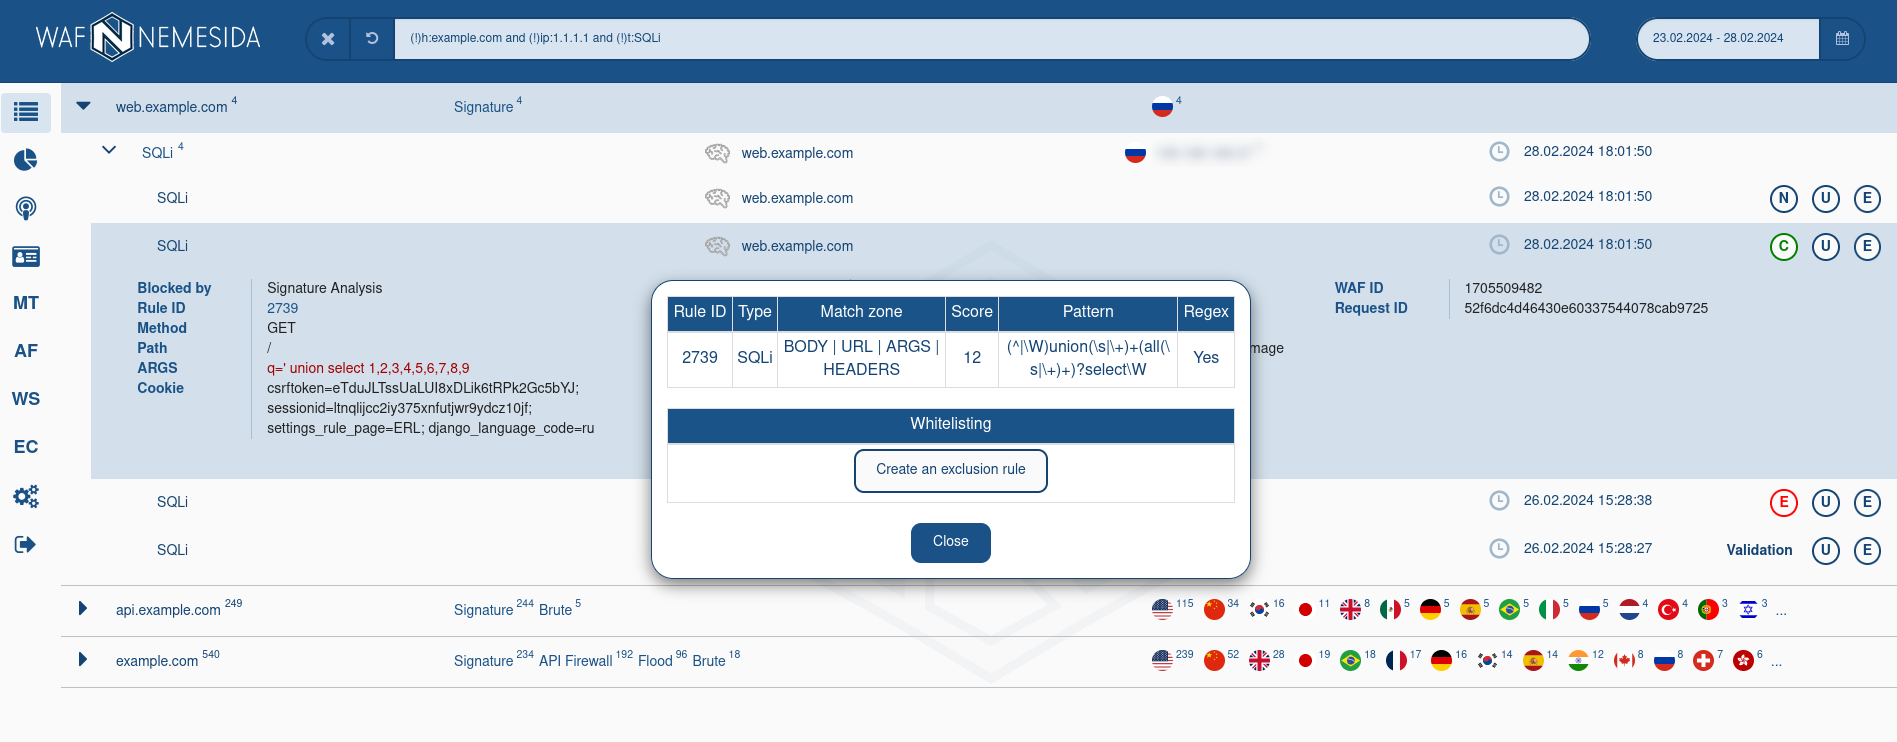
For requests, which were blocked by signature method, the field Rule ID is available. If you will click on this field, in the pop-up window following information will display:
- the information about the signature structure;
- the exception rule (
WL) for adding in Nemesida WAF configuration file.
More information about signatures and exception rules is available in the corresponding section of the guide.
When you hover the cursor over the flag of the country next to the IP address, extended information about it will be displayed based on GeoIP data (for example, whether the IP address belongs to a hosting provider or proxy server, whether the IP address is blacklisted, etc.).
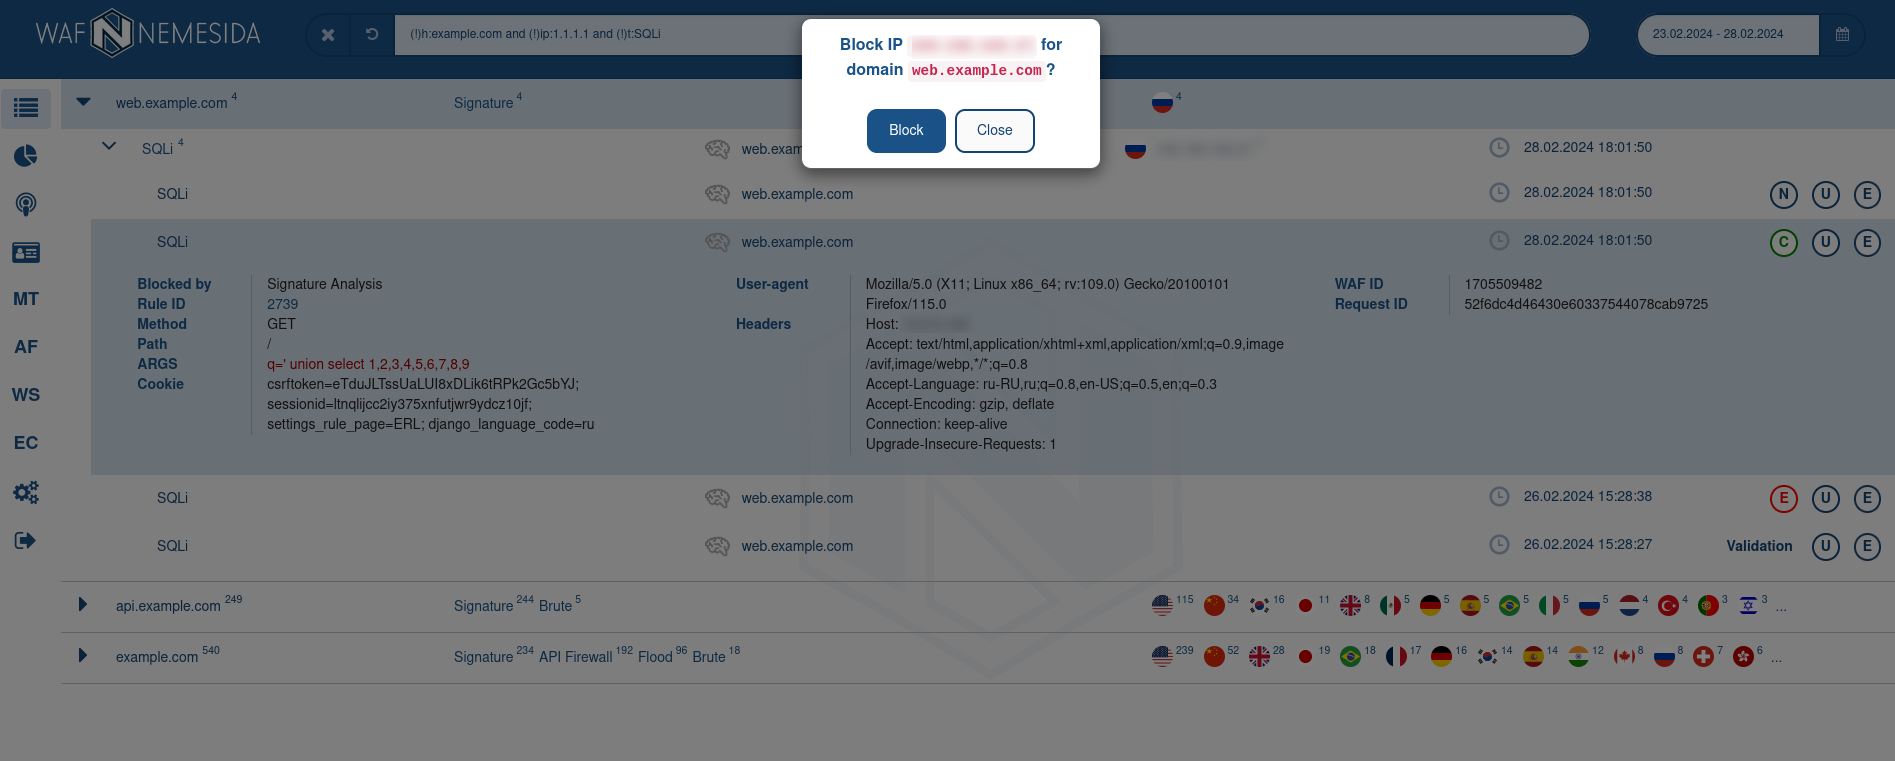
When you click on ![]() button near the IP address, a dialog box will appear that will suggest blocking the IP address for calls to the specified domain. You can manage the list of blocked IP addresses in corresponding section. Available only for the Enterprise plan.
button near the IP address, a dialog box will appear that will suggest blocking the IP address for calls to the specified domain. You can manage the list of blocked IP addresses in corresponding section. Available only for the Enterprise plan.
Recheck functionality
Except the main functionality Nemesida WAF Scanner allows to operate resending of the blocked request content and/or different various on the protected web application. Users are included in «Administrators» group are able to operate this check using button ![]() , which becomes available when the grouping for detected attacks
, which becomes available when the grouping for detected attacks XSS, SQLI, LFI, RFI types, that have BT 1 or 2, is switched off. The verification status is displayed instead of the button ![]() . In case the vulnerability detection the information will be available in the section «Scanner» in Nemesida WAF Cabinet. The administrator can exclude the request by clicking on
. In case the vulnerability detection the information will be available in the section «Scanner» in Nemesida WAF Cabinet. The administrator can exclude the request by clicking on ![]() . Then information about this request will be available in the admin panel in the «Scanner» tab. To use Recheck functionality you should set up section
. Then information about this request will be available in the admin panel in the «Scanner» tab. To use Recheck functionality you should set up section [recheck] in file /opt/nws/main.conf.
Using
Recheckcan lead to the execution of arbitrary code from the request on the web application side. Use the functionality only if you are completely confident in your actions.
Possible meanings:
Validation— check is processing; – vulnerability is detected;
 – vulnerability is not detected;
 – an error occurred while processing the request by the vulnerability scanner.
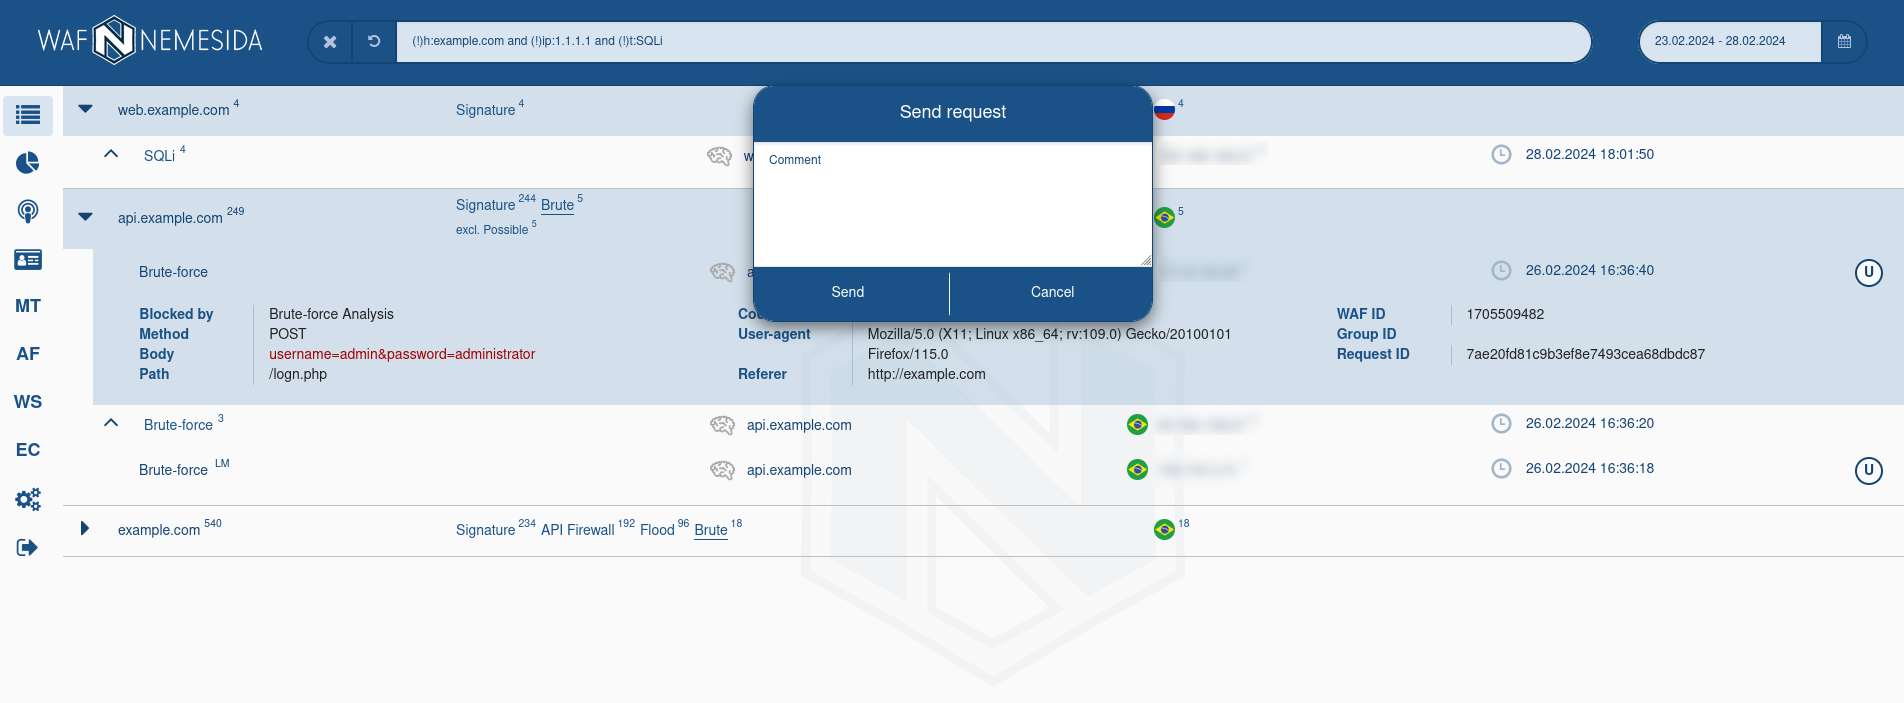
Unlock Request functionality
A user of Nemesida WAF Cabinet, who considers the blocking of the request to be erroneous, can send an application to unlock it to the administrator by pressing the button ![]() . An email with a description of the order will be sent to the administrator. The list of all orders is located in the tab
. An email with a description of the order will be sent to the administrator. The list of all orders is located in the tab ![]() in the admin panel. The request can be unlocked or left locked. To unlock the request, the administrator needs to create a appropriate rule for Nemesida WAF, after which the user will receive a notification.
in the admin panel. The request can be unlocked or left locked. To unlock the request, the administrator needs to create a appropriate rule for Nemesida WAF, after which the user will receive a notification.
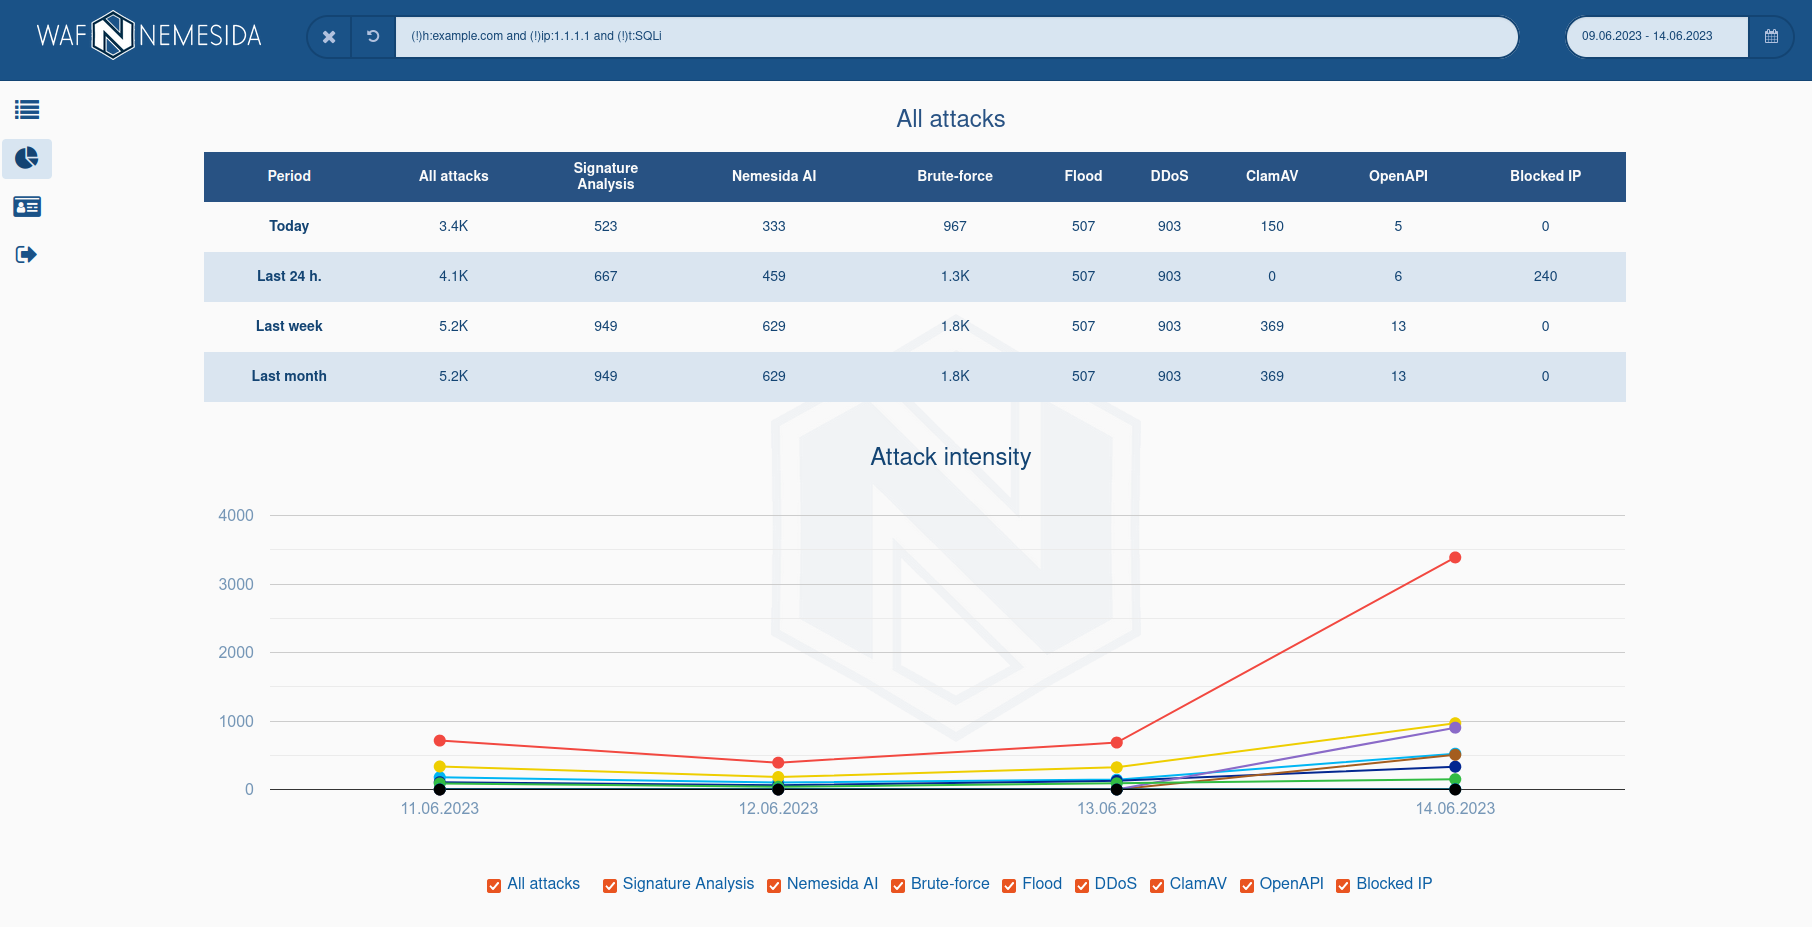
The table All attacks displays the quantitative indicators of anomalous requests for a specific period of time and by their categories.
The schedule Attacks intensity displays the intensity and dynamics in the context of a given period and selected categories of attacks.
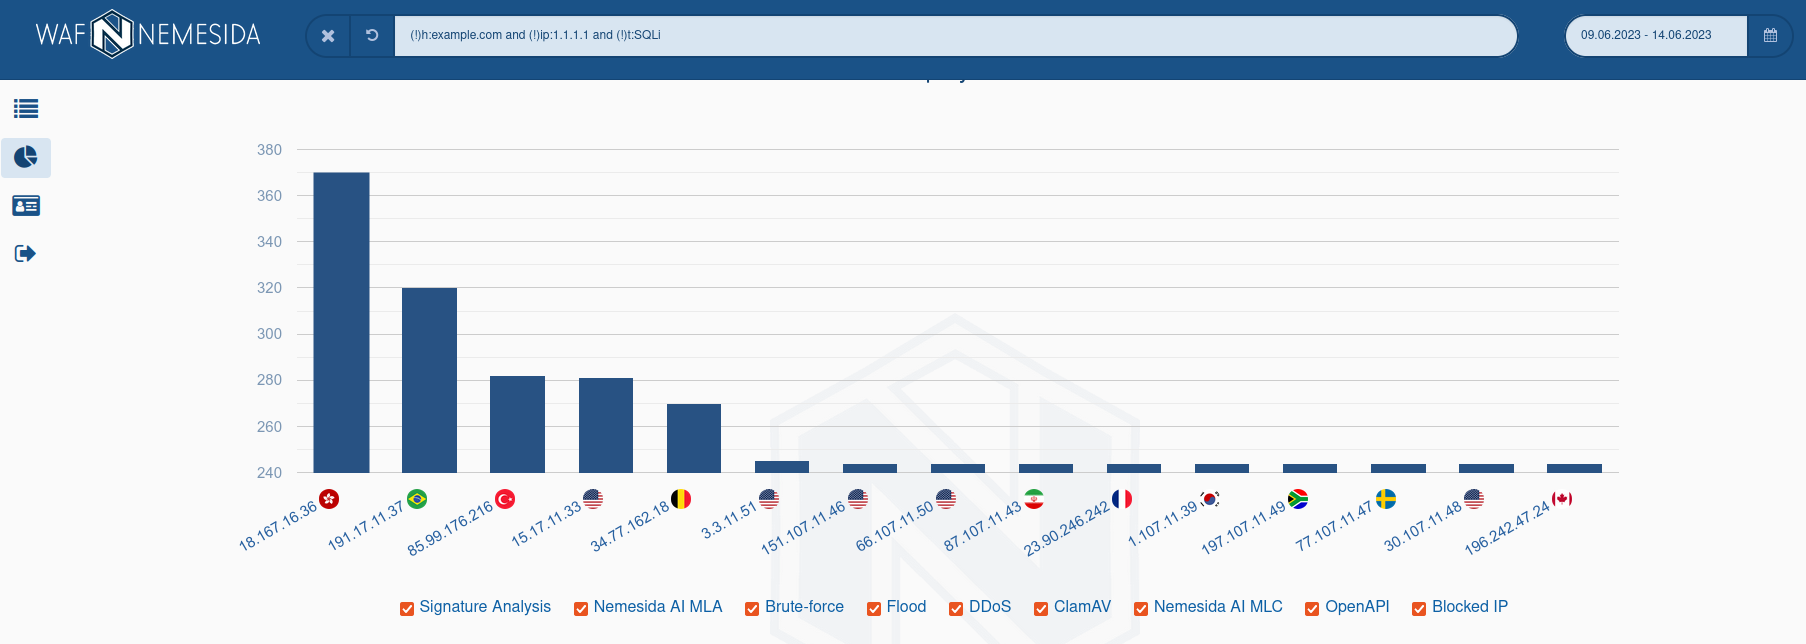
The charts Last 24 h. and Top by IP display the Top-10 domains that were attacked and Top-10 IP addresses from which anomalous requests came.

The search area and event selection for a specific period are available at the top of the page. On the
Summary and Attack pages, you can search both in the normal mode (without specifying special parameters) and in the advanced mode using the following directives:
To limit the display of information in the search field, the logical operators «!» (exception) and «and» (association) are available.
You can search for events both in normal mode (without specifying special parameters) and in advanced mode, using the following directives:
To limit the display of information in the search field, the logical operators «!» (exception) and «and» (association) are available.
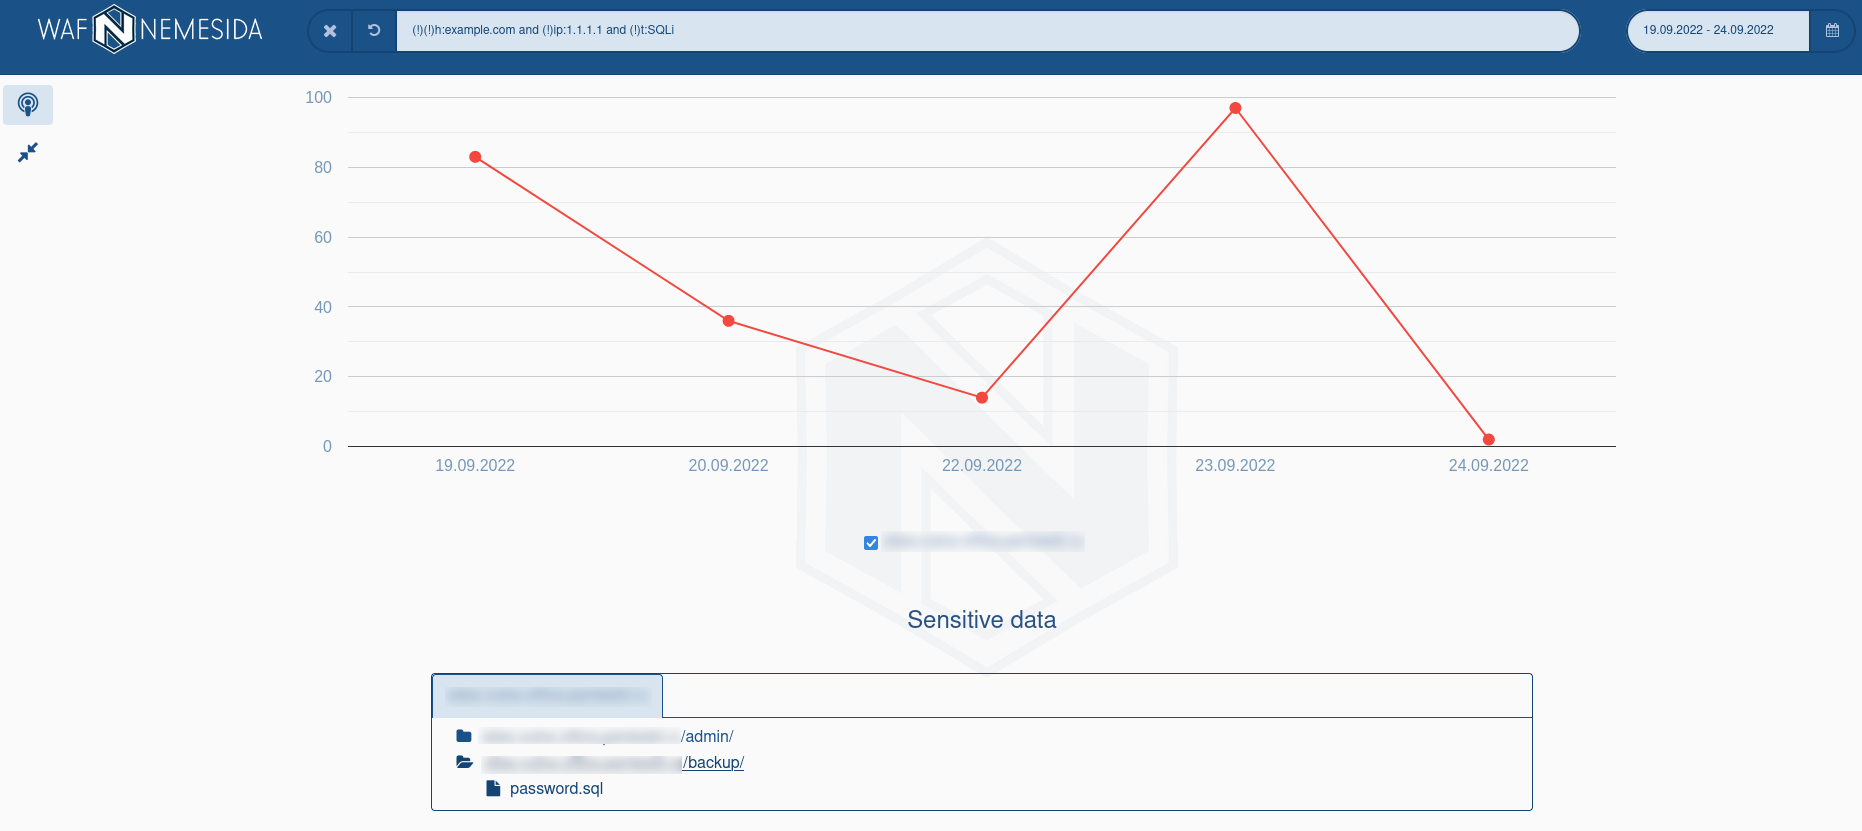
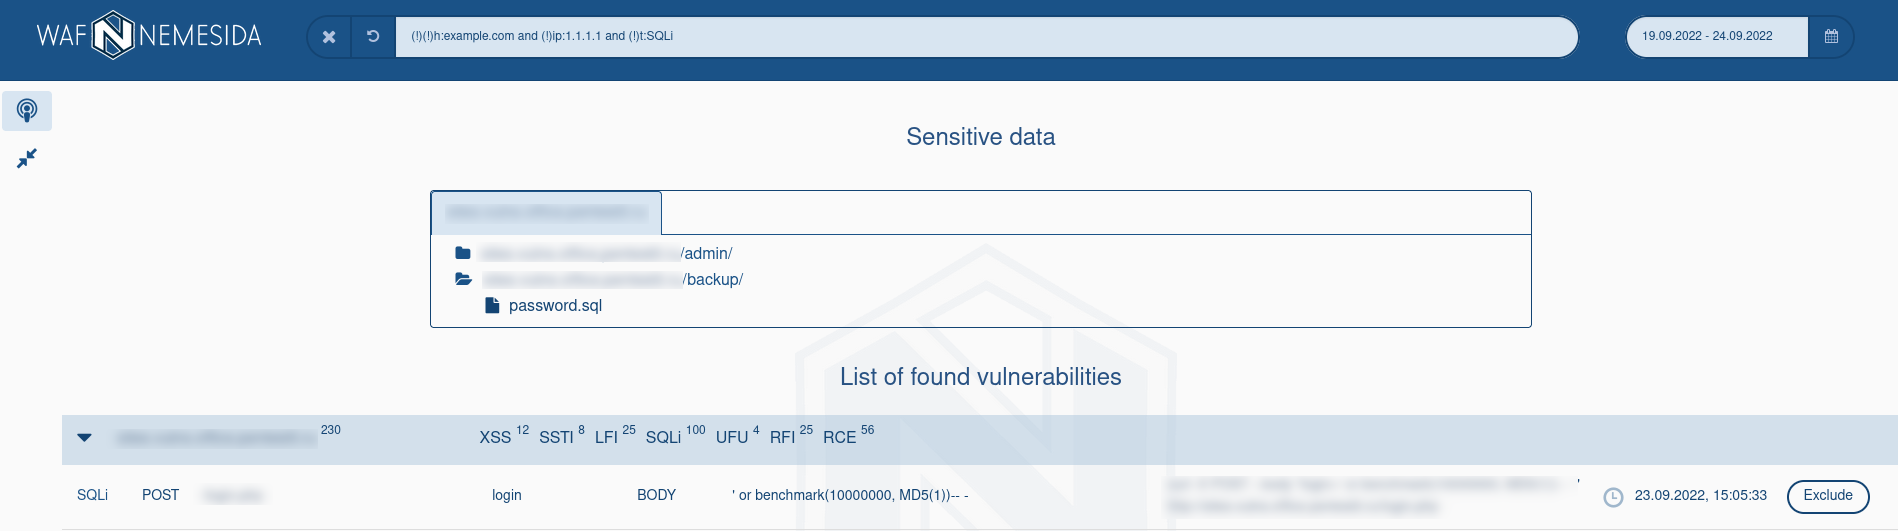
Clicking on the page ![]() opens a page with a list of detected vulnerabilities with tracking of their re-discovery/fixed for a selected period, just select the time interval for displaying records, where:
opens a page with a list of detected vulnerabilities with tracking of their re-discovery/fixed for a selected period, just select the time interval for displaying records, where:
 – new vulnerability/re-discovered;
 – vulnerability is fixed/not re-discovered.
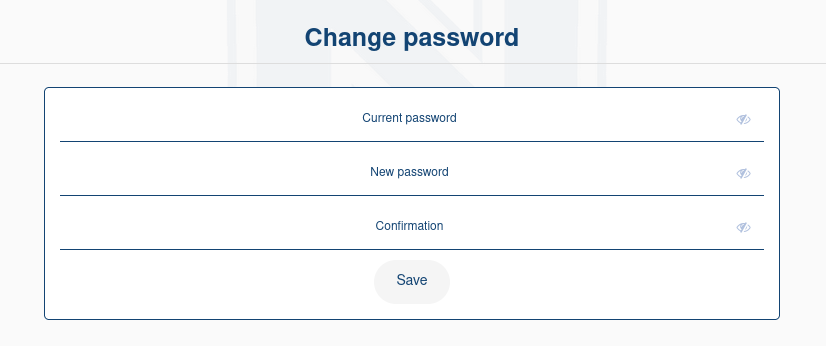
- change password;
- add a license key to manage WAF and API Firewall settings;
- configure sending notifications about attacks.


On the page ![]() The Nemesida WAF local settings management web interface is available. To use the functionality, several conditions must be met:
The Nemesida WAF local settings management web interface is available. To use the functionality, several conditions must be met:
- added a license key to user settings;
- the functionality is activated by the administrator;
- the address of the connection to the Nemesida WAF API is specified in the parameter
API_URI(file/var/www/app/cabinet/settings.py).
Local settings management means that all settings set when using the Nemesida WAF Cabinet are stored locally, are not transmitted outside the network perimeter and do not depend on the availability of the server
nemesida-security.com.
Filtering node
After clicking on ![]() the Nemesida WAF filtering node settings management section opens.
the Nemesida WAF filtering node settings management section opens.
To complete the configuration of this module, it is enough to set a condition for temporary automatic blocking of the IP address (ban). Using the parameter will allow the functionality of detecting DDoS attacks, brute force attacks and flood attacks to block the source of the attack.
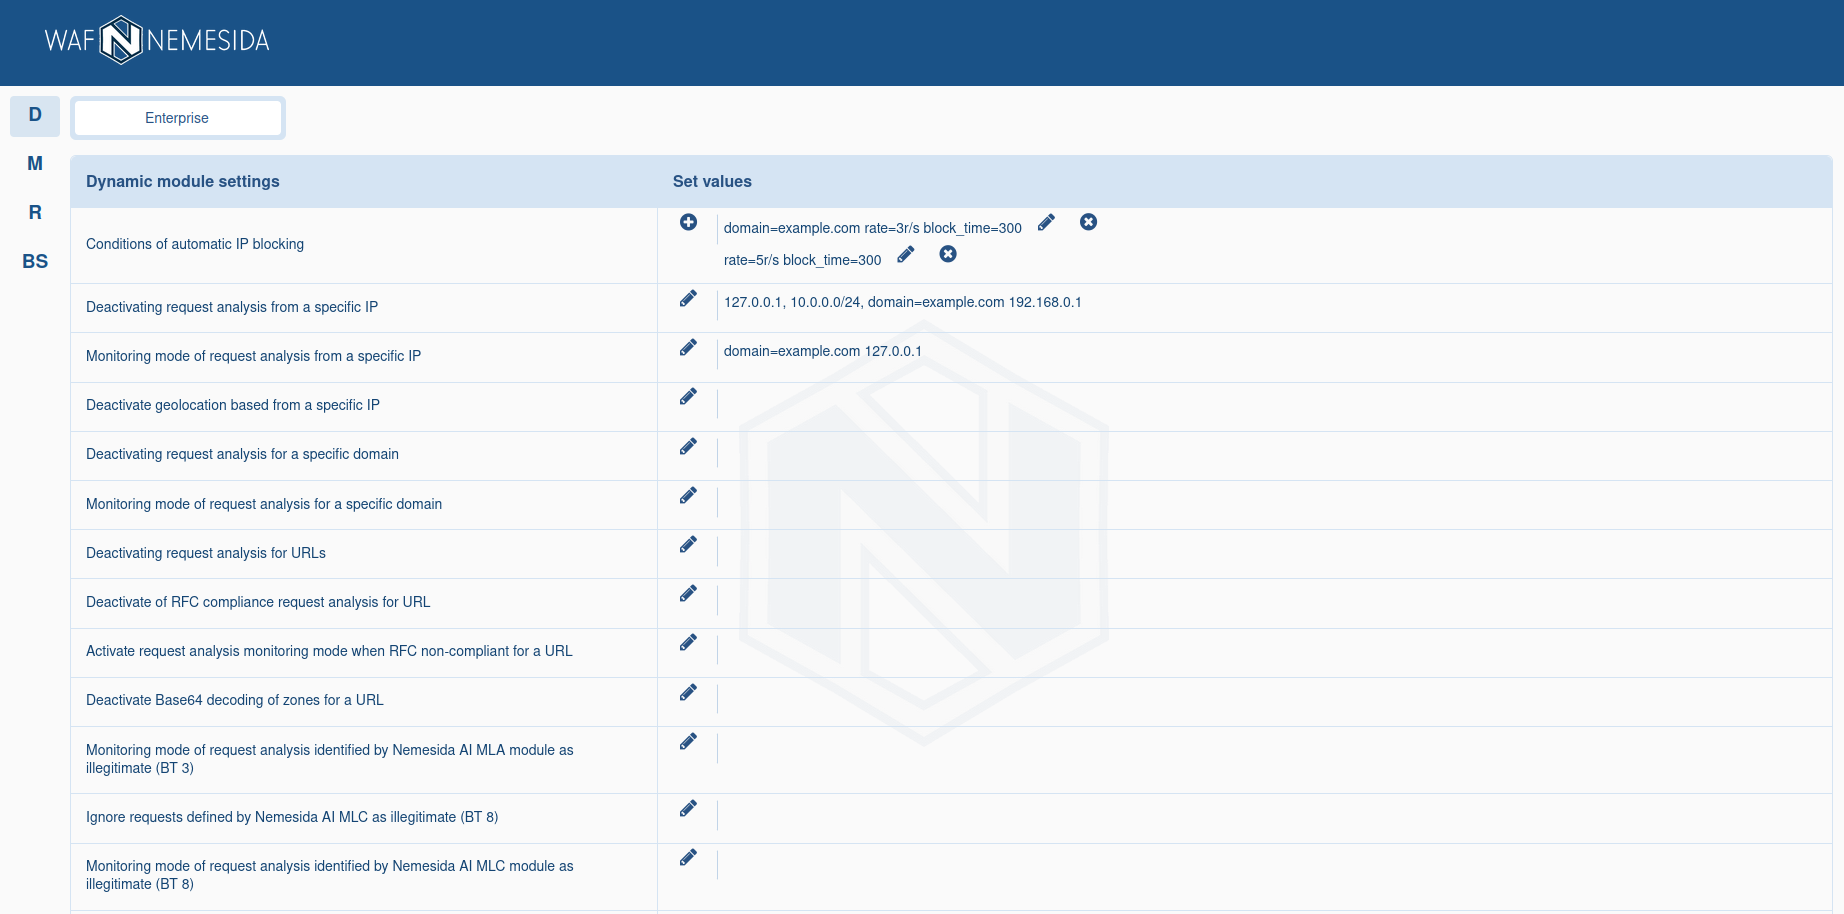
By clicking on ![]() you can add a new set of values for the parameter, a dialog box will appear for this.
you can add a new set of values for the parameter, a dialog box will appear for this.
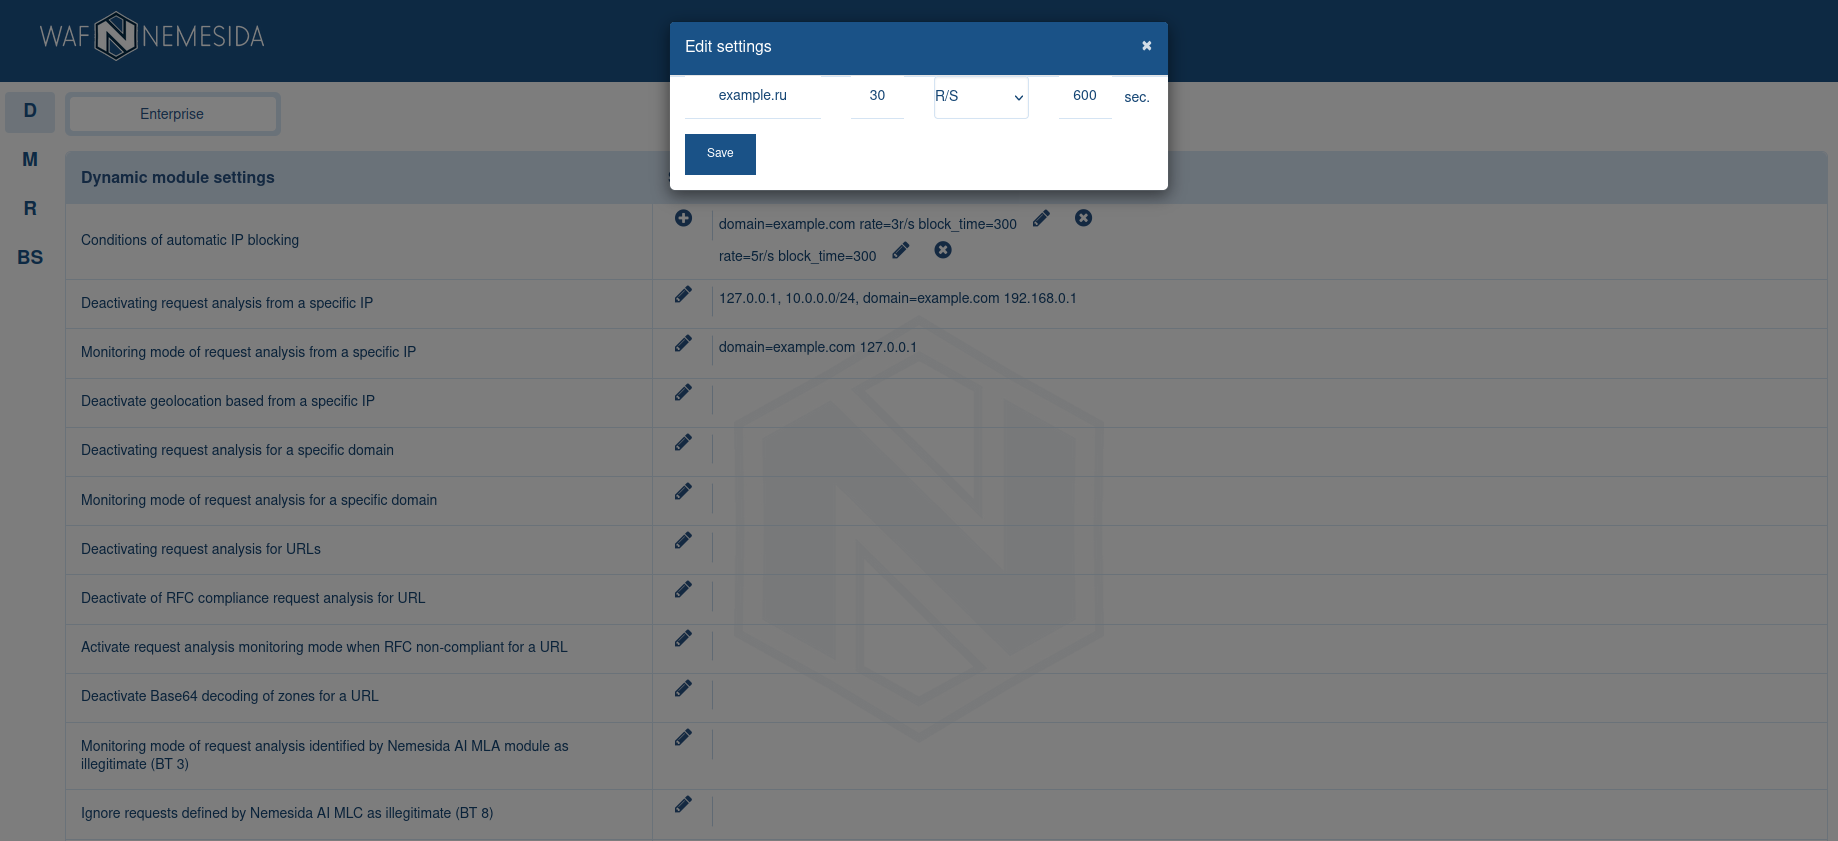
For example, we added a request blocking condition separately for the domain example.com and blocking conditions for all other domains. To edit the current settings, click on ![]() .
.
After saving, the settings are applied automatically to all installed copies of the Nemesida WAF filtering node, the settings of which can be controlled using a web application.
Nemesida AI MLC
When clicking on ![]() opens the settings management section of the Nemesida AI MLC machine learning module. To activate additional features (detection of DDoS attacks, brute force attacks and flood), it is necessary to activate the corresponding sections.
opens the settings management section of the Nemesida AI MLC machine learning module. To activate additional features (detection of DDoS attacks, brute force attacks and flood), it is necessary to activate the corresponding sections.
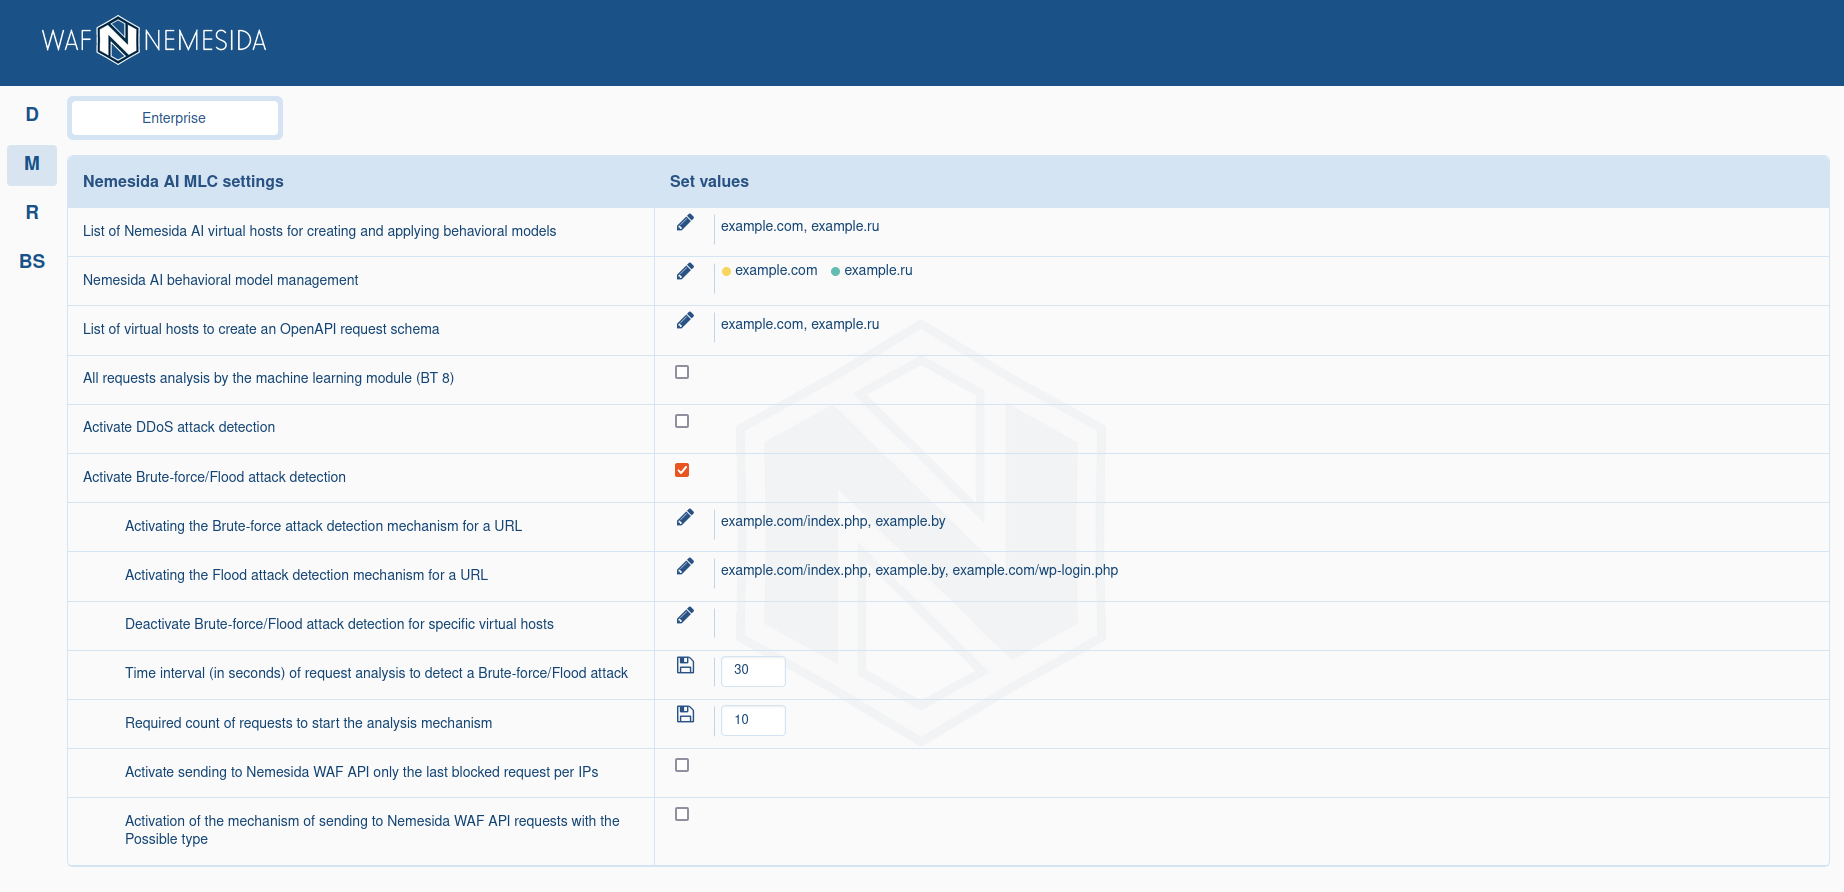
For Light plan available only detection of DDoS attacks, brute-force and flood attacks settings.
Behavioral Model Management 
To start the process of building behavioral models, you need to add a virtual host corresponding to the domain of the protected web application, for example, example.com.
Behavioral models whose training has been completed are displayed in the section «Behavioral models of Nemesida AI». Next to the name of each behavioral model there is a status indicator, where:
 – the behavioral model is being retrained;
 – training is completed, the behavioral model is applied to the virtual host.
If you need to retrain the model, then you need to click ![]() and select the retraining mode. If the retraining of the model should be performed during the standard period (4 days), then to start the retraining process, just click
and select the retraining mode. If the retraining of the model should be performed during the standard period (4 days), then to start the retraining process, just click ![]() .
.

Increasing the learning time of Nemesida AI behavioral models
The correct construction of models requires about 400.000-800.000 unique requests. By default, the training period is 4 days. To change the training period, click ![]() and an additional field will appear where you need to specify the training period in days.
and an additional field will appear where you need to specify the training period in days.

Additional training of models using a backup copy of the training sample
If the number of requests was insufficient during the training, then you can restart it and use the requests from the previous sample. To do this, follow these steps:
1. Stop the Nemesida AI MLC service:
# service mlc_main stop
2. Move the file /opt/mlc/ml/backup/[vhost].d_[timestamp], where [timestamp] is the date of creation of a backup copy of the training sample created by Nemesida AI MLC before starting the model construction, in /opt/mlc/ml/[vhost].d. For example, for the model example.com:
# mv /opt/mlc/ml/backup/example.com.d_1613587613 /opt/mlc/ml/example.com.d
3. Start the training.
4. Launch the Nemesida AI MLC service:
# service mlc_main start
Copying a behavioral model
To copy the behavioral model to another virtual host, click ![]() and select the virtual host for which the behavioral model will be copied.
and select the virtual host for which the behavioral model will be copied.

Removing a behavioral model
In case of incorrect training of behavioral models or significant changes in the web application that lead to a lot of false positives, it is recommended to delete the models. To delete a model, select the desired model and click ![]() .
.
Managing rules
The Personal account allows you to create signature exclusion rules and advanced request blocking rules. To go to the rules management section, go to the section ![]() .
.
Exclusion rules
An exception rule is intended to exclude a request from processing using a rule.
To create a rule, click on the 
When drawing up an exception rule, you must specify:
IDof the signature to be excluded from triggering. The value can be set either as a number (for example,2728) or with the symbol*to exclude the triggering of all signatures that match the specified criteria;- virtual host (domain name);
- signature occurrence zone (for example,
ARGS,BODY,HEADERS, etc.). Multiple zones can be selected at once, then the signature will be excluded when detected in any of the listed zones.
Rashly adding signature exclusion rules is unsafe and can lead to missed attacks. Therefore, it is recommended to specify the conditions for triggering the rule as much as possible using clarifications.
123 for a virtual host example.com , if the signature was detected in the ARGS zone, it is enough to set the conditions:
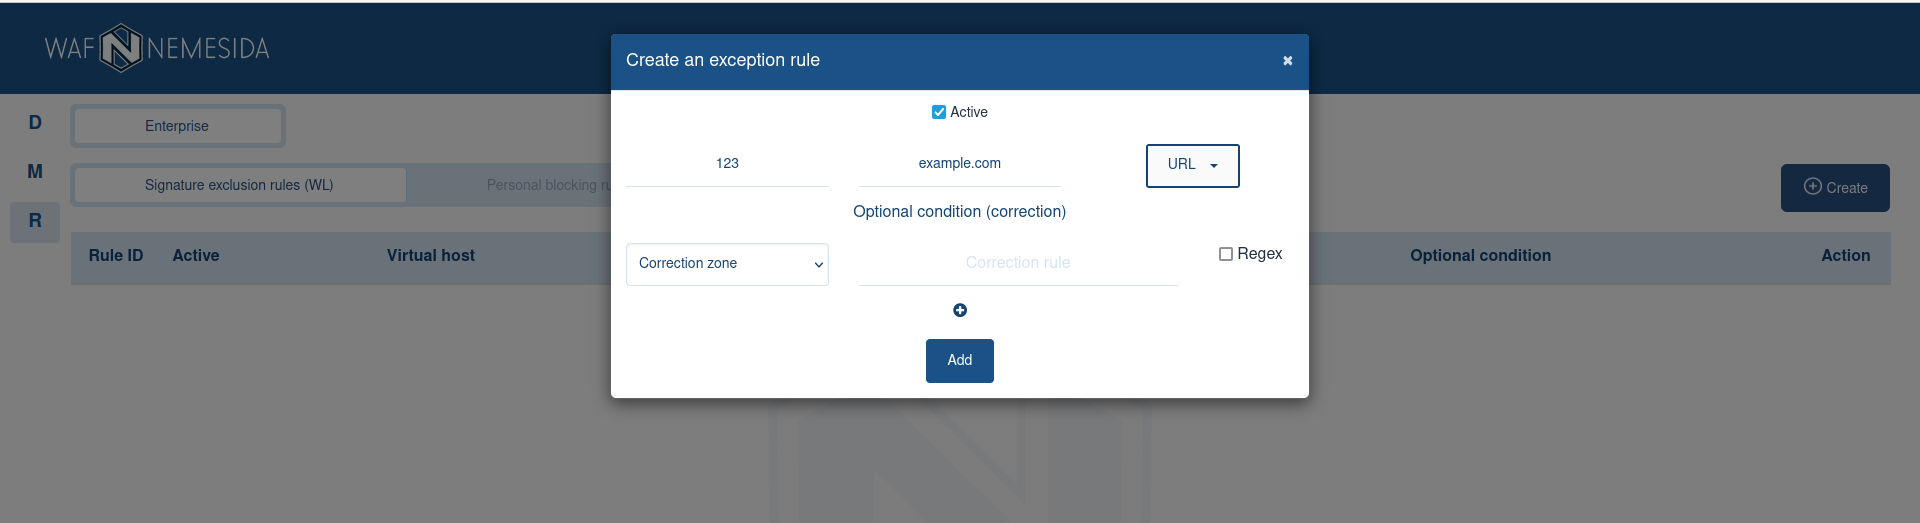
But adding, in addition to the main condition, an additional (refinement), for example, the refinement zone URL with the value /index.php , the signature will be excluded only if both conditions are met simultaneously:
- the zone of occurrence of the signature
123will be the zoneARGS; URLcontains an occurrence of/index.php.
The clarification is applied as an occurrence of the specified template. Several clarifications interact with each other according to the principle of logical & (for the rule to work, the main condition and all added clarifications must be met). Regular expressions are allowed to be used during clarification. For example, the regular expression id=[a-z0-9]+, used in the refinement zone Cookie, will mean that the additional condition for triggering the exclusion rule will be the presence of a string (for example, id=abcd07dj45rff) in the Cookie zone, according to the regular expression pattern.
Additional conditions can be combined by adding new ones when creating/editing an exclusion rule. The rule is edited by clicking on ![]() .
.
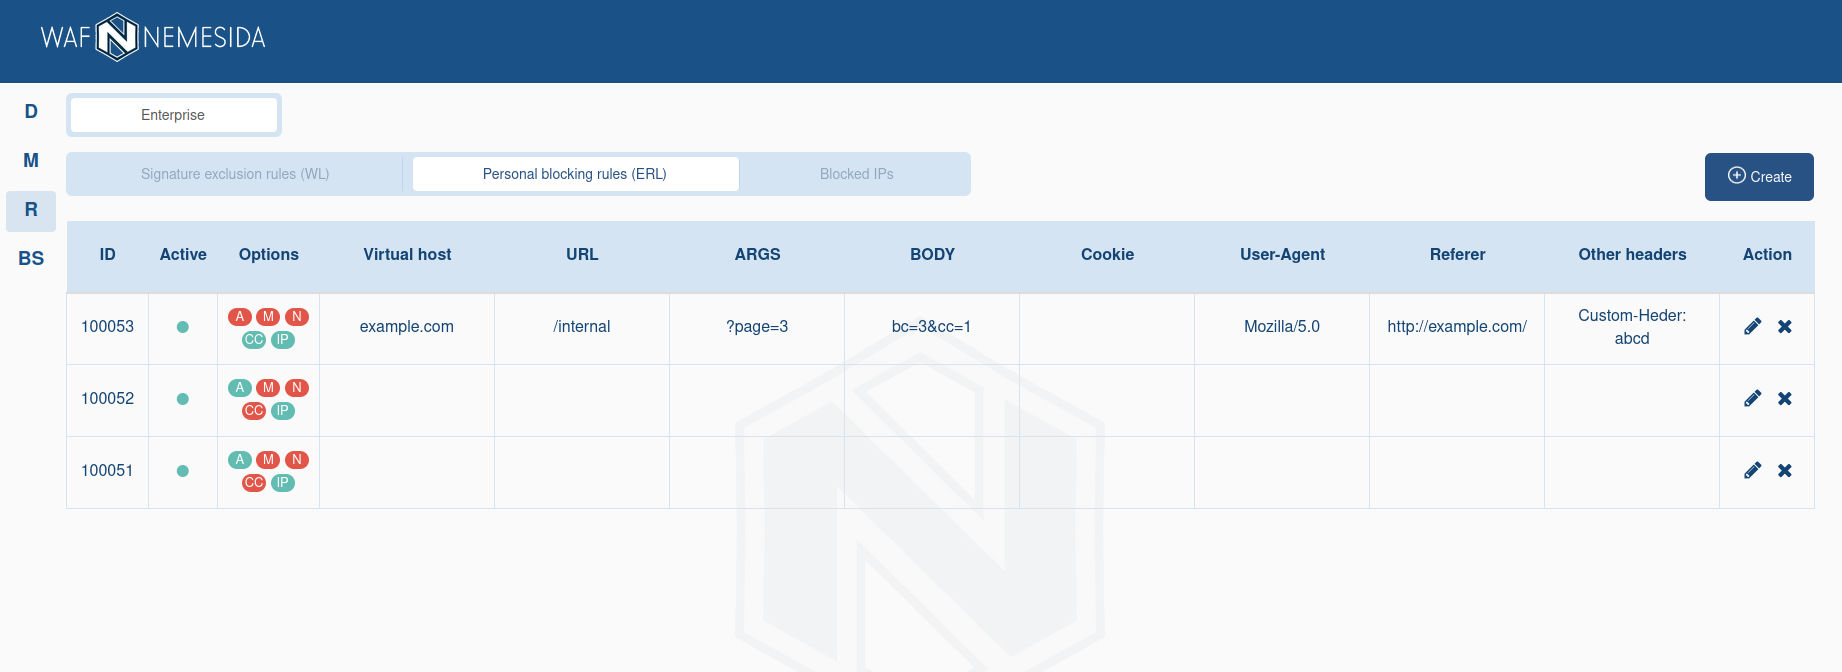
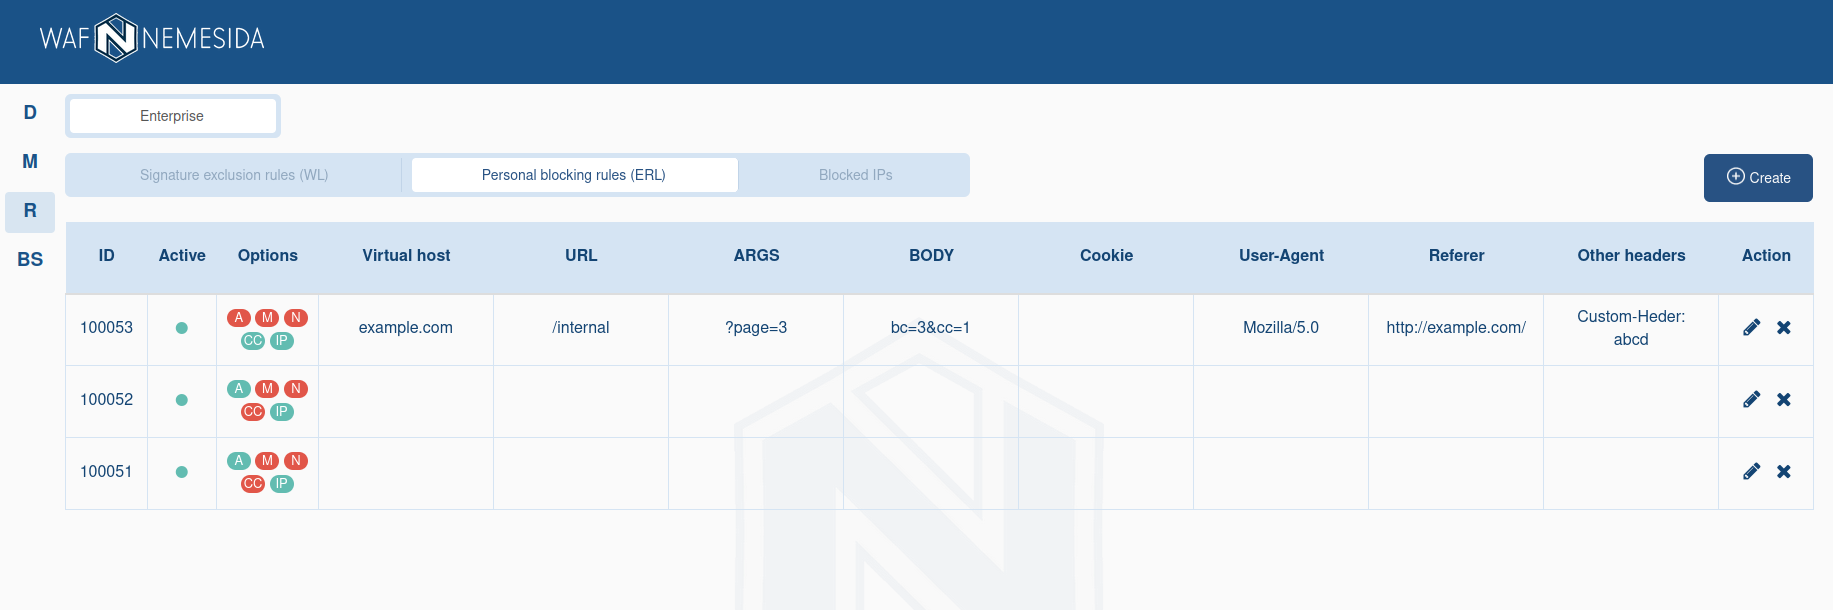
Extended request blocking rules
The functionality of the extended request blocking rules is similar to the functionality of creating personal signatures. It allows you to create a request blocking rule with a combination of different parameters, but without the support of regular expressions.
The mechanism of extended request blocking rules allows you to use additional conditions when drawing up personal rules. For example, you can create a rule by which the request will be blocked if:
- corresponds to a geographical location based on an IP address (determining the country by the attacker’s IP address);
- there is an appeal to a specific domain or URL;
- contains a specific header (for example,
User-Agent,Cookie,Referer, etc.) and/or the contents of these headers.
For a more accurate result, the parameters can be combined with each other. In this case, the rule will only work if all the conditions are met.
Unlike the functionality of creating personal signatures, the extended request blocking mechanism allows you to create a rule with a combination of various parameters, but without the support of regular expressions.
Creating a request blocking rule
To create a request blocking rule, go to the «Personal Blocking Rules (ERL)» tab and click ![]() . After selecting the necessary options, you need to add one or more conditions by clicking on
. After selecting the necessary options, you need to add one or more conditions by clicking on ![]() .
.
For all condition parameters (except No Cookie), it is allowed to use multiple values in one parameter block using the logical condition operators «and», «or», «not» (available only for the first value in the block), «and not», «or not». Operators do not have priority.
Due to the peculiarities of request processing, the functionality is not designed to work with a large number of IP addresses. If you need to block requests for a list of IP addresses, use the «Blocked IPs» functionality.

Values for parameters can be entered in a list, for this you need to use the «multiline input» function. The values entered in the field will be combined with each other by the logical operator used for this field.
To add a new condition, select it from the list and repeat the process.
Other headers
The parameters for the «Other headers» block are used in the key/value format and interact with each other according to the following principle:
- if there is a header, the content of only this header will be checked;
- if there is a header without content, any content of this header will be checked;
- if there is only the header content, the specified content in any header will be checked.
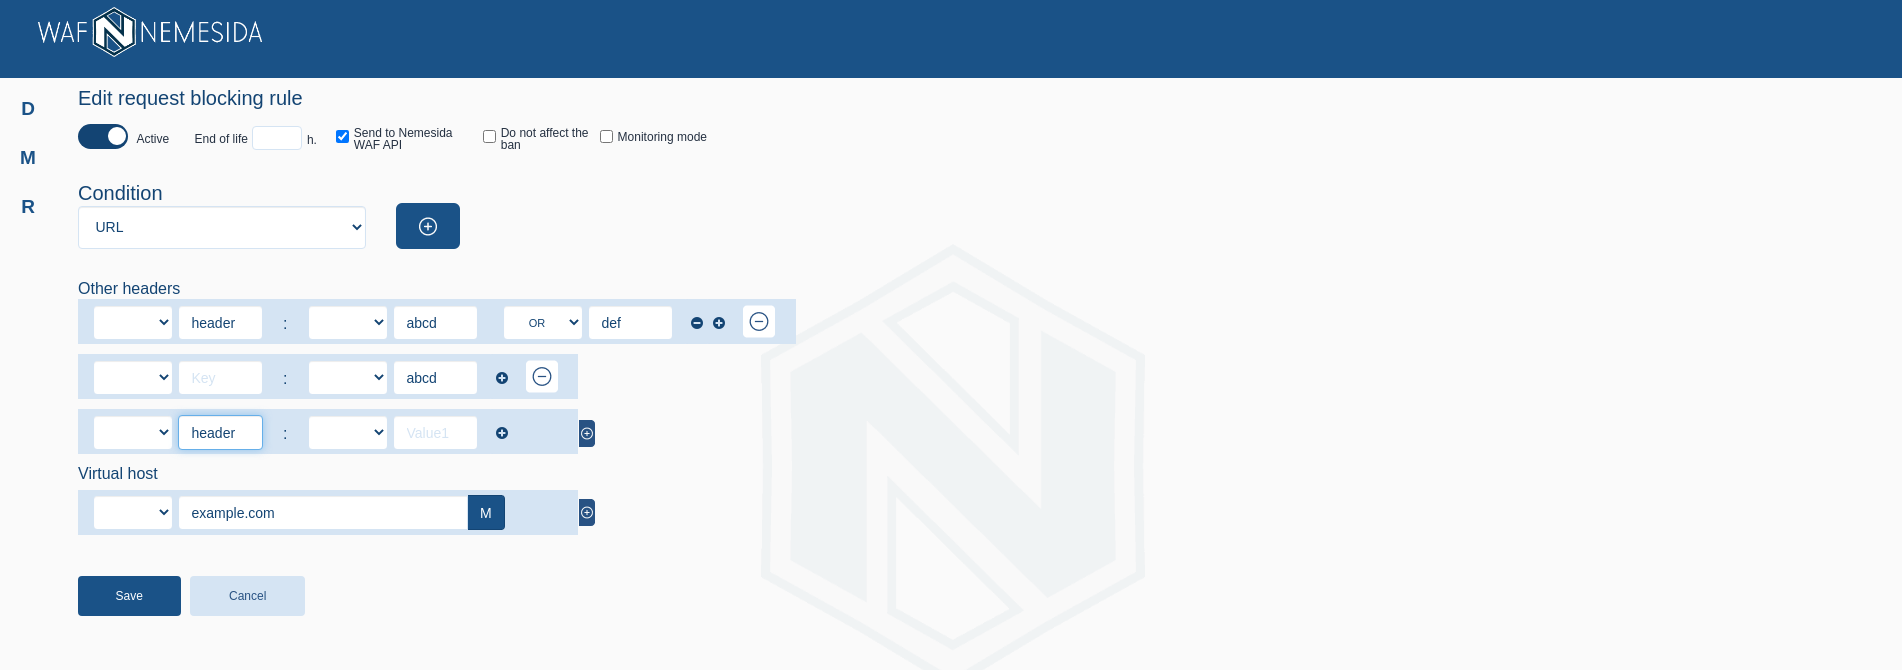
The rule is edited by clicking on ![]() .
.
Creating a list of blocked IP addresses
Allows you to create a list of IP addresses from which requests will be blocked for certain (or all) domains. To create a list, it is enough to specify the IP address(s) and the domain for which it is necessary to block access from these addresses. When adding data, a table will be displayed on the page, in which the following values will be specified:
- Domain – the domain for which requests from the specified IP address will be blocked;
- Number – the number of IP addresses added to the list.
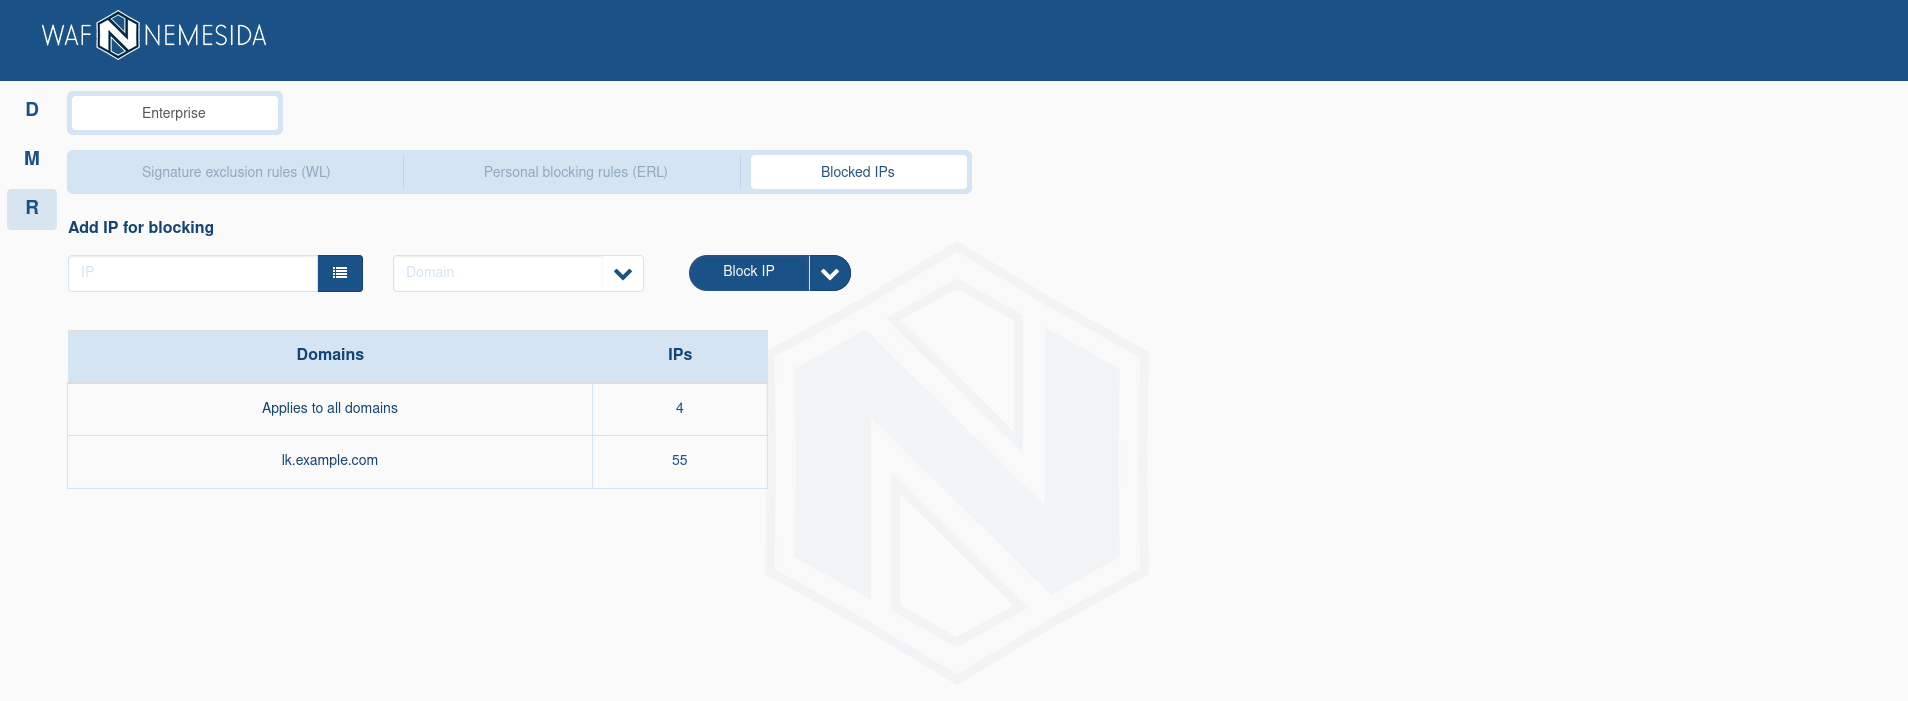
IP addresses added without specifying the domain will be applied to all domains. IPv4/IPv6 addresses are allowed, including the use of CIDR (for example, x.x.x.x/24) and a range of IP addresses.
Information about requests from IP addresses from the blocked list is not sent to the Nemesida WAF API by default and is not displayed on the attacks page. To send information about a blocked IP address to the Nemesida WAF API, you must activate «Send to API» when adding it by clicking on ![]() .
.
Editing the list of blocked IP addresses
Clicking on the number of IP addresses will display a list of all the IP addresses added for the domain. When you click on an IP address, it will be automatically removed from the list.
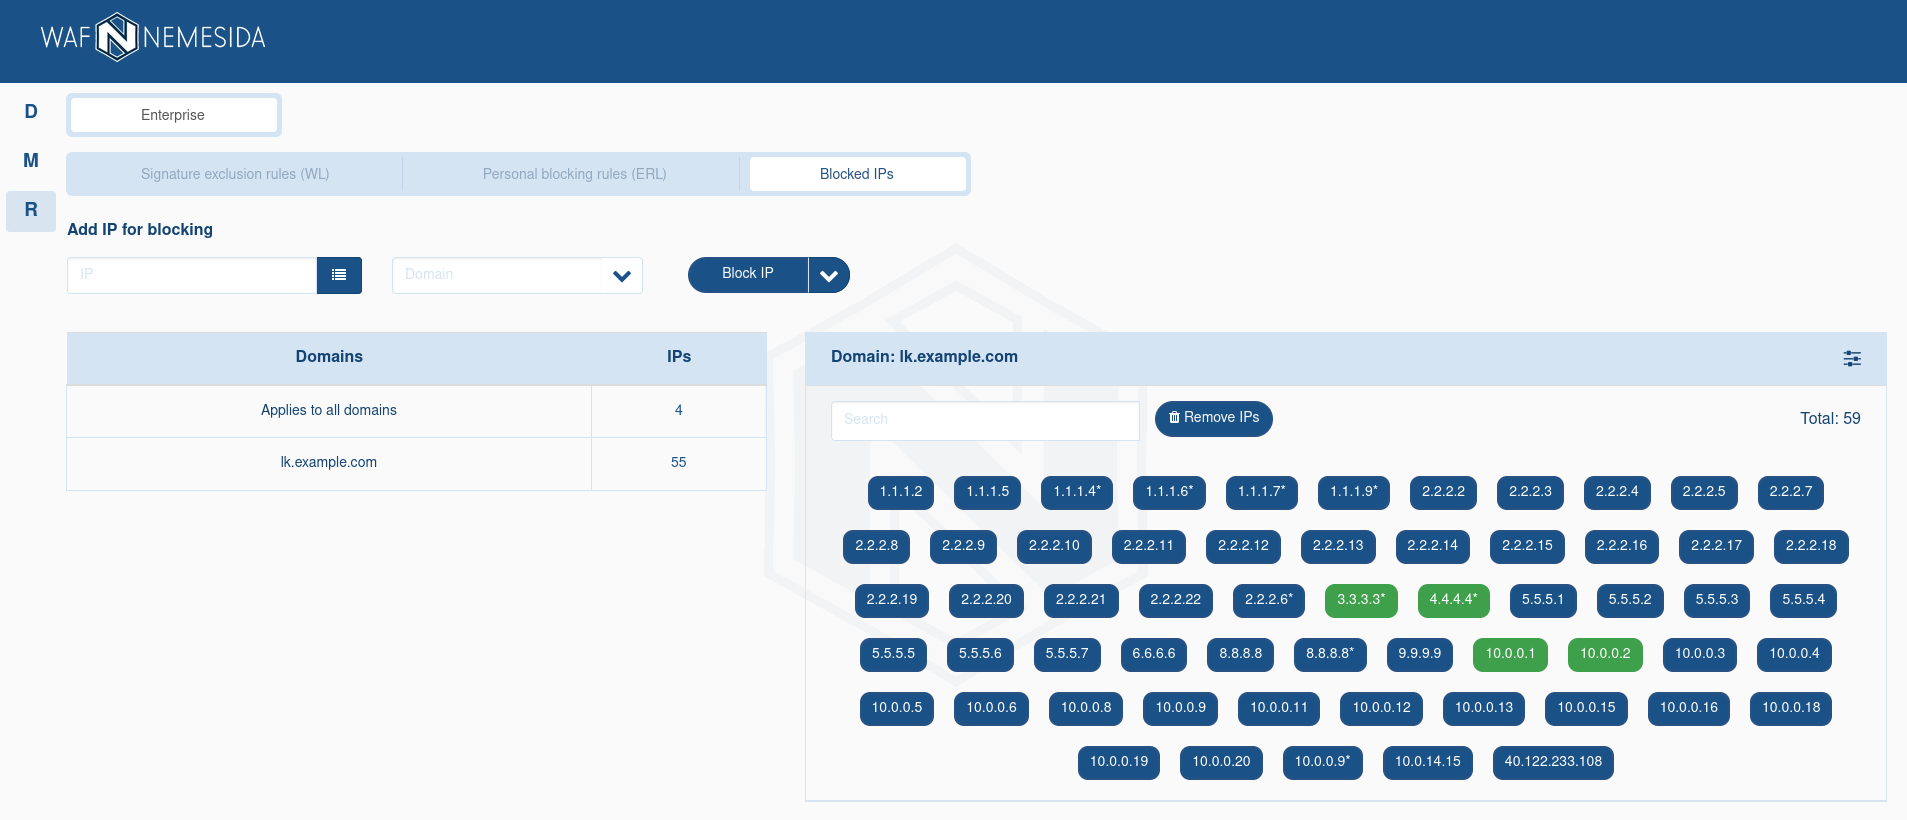
IP addresses are displayed in two formats:
 – IP address added for this domain;
 – the IP address added for all domains, including the current one.
The symbol * near to the IP address means that incidents involving blocked requests from an IP address from the Blocked IP list will be sent to the Nemesida WAF API. To change the sending settings in the Nemesida WAF API for an IP address, you need to:
- click on an IP address;
- activate/deactivate «Send to Nemesida WAF API»;
- save changes.
To delete an IP address, click on it or enter a list using the input field. Green IP addresses refer to all domains and to delete them, you need to go to the appropriate list.
When you click on ![]() you can sort IP addresses by the «Send to Nemesida WAF API» option activated.
you can sort IP addresses by the «Send to Nemesida WAF API» option activated.
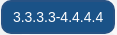
Managing the list of automatically blocked IP addresses
When you click on ![]() the interface for managing the list of automatically blocked IP addresses will be available. All addresses displayed on this page were automatically blocked when the allowed number of locks from one IP address was exceeded, which was set by the «Conditions for automatic IP address blocking» parameter. The following information is displayed on the page:
the interface for managing the list of automatically blocked IP addresses will be available. All addresses displayed on this page were automatically blocked when the allowed number of locks from one IP address was exceeded, which was set by the «Conditions for automatic IP address blocking» parameter. The following information is displayed on the page:
- The IP of the request source that was blocked;
- Remaining blocking time (in seconds).
When an IP address is removed from the list, it is automatically unblocked on the filtering node. To unlock the IP address, click ![]() on next to it. When you click on «Delete all» button all IP addresses will be removed from the list and unblocked on the all filtering node.
on next to it. When you click on «Delete all» button all IP addresses will be removed from the list and unblocked on the all filtering node.
Before sending a request to the Nemesida API Firewall for analysis of compliance with the specification, the method by which the request was sent is checked. If the request method does not match
GET,POST,PUT,PATCH,DELETE,HEAD,OPTIONSorTRACE, the request will be blocked.
To use the functionality, several conditions must be met:
- added a license key with the Business or Enterprise plan in user settings;
- the functionality is activated by the administrator;
- the address of the connection to the Nemesida WAF API is specified in the parameter
API_URI(file/var/www/app/cabinet/settings.py).
For the Business and Enterprise plan, the functionality is managed locally (the created specifications are stored in the local database).
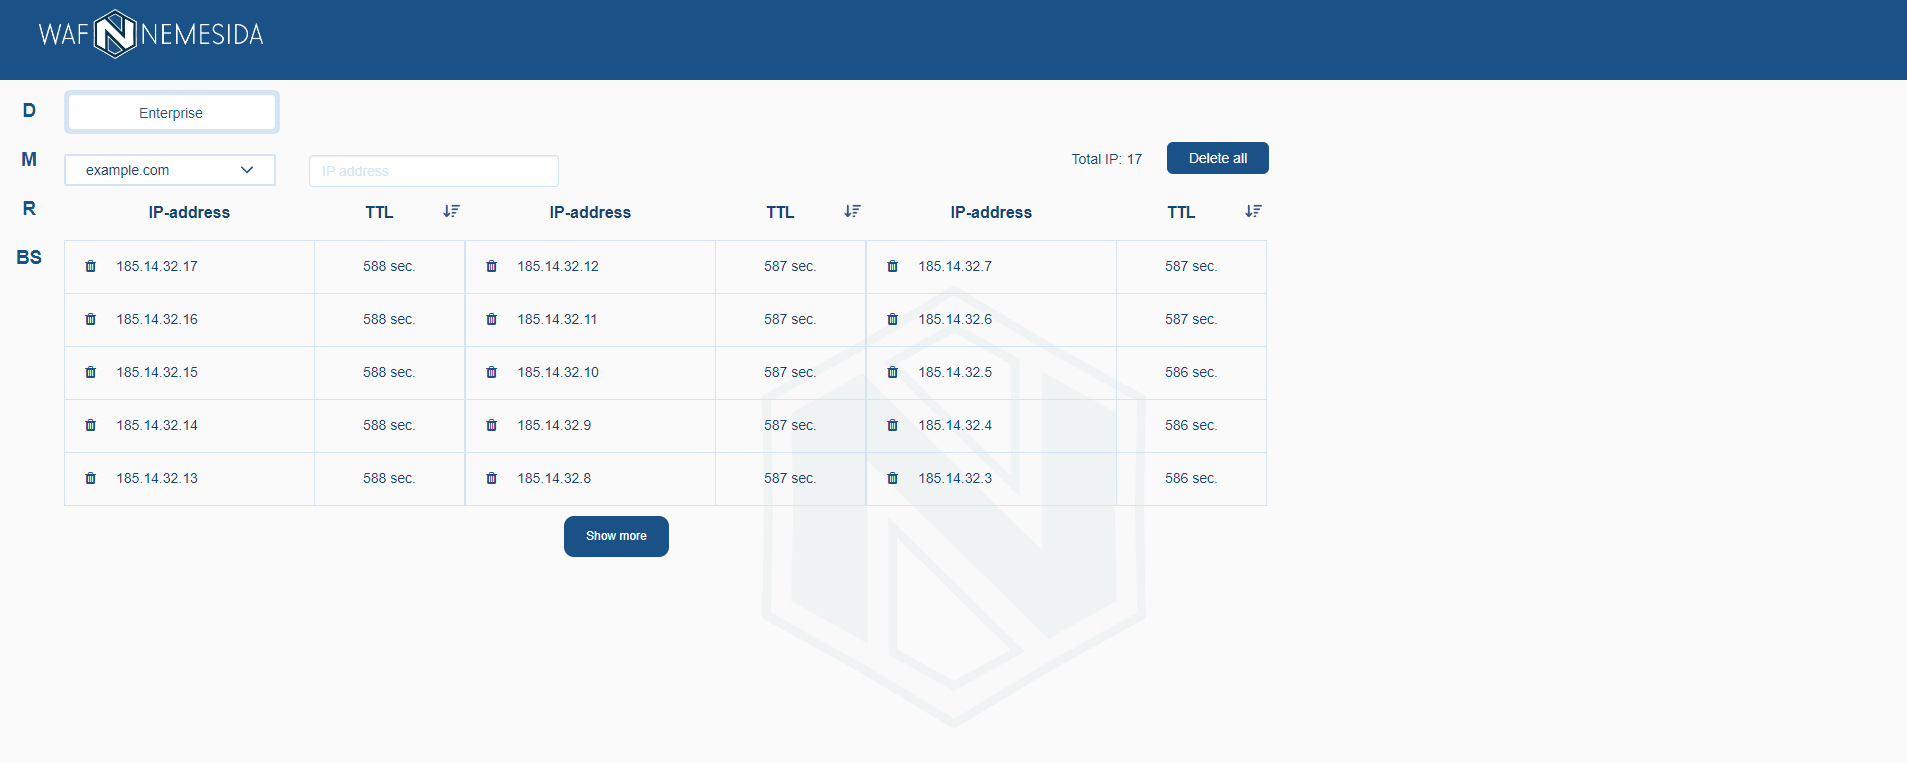
Adding a specifications
To add a new specifications you must:
- click
 ;
; - in the dialog box, you need to specify the specification’s name. Strict matching and wildcard values are allowed in the specification’s name:
example.com,.example.com,*.example.com,*; - upload the specification file in
JSONorYMLformats.
To work correctly, you must use the
OpenAPI v3.1specification.
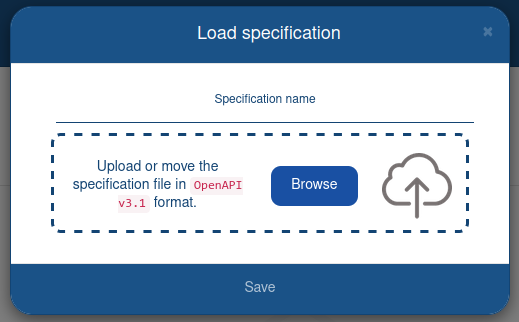
The added specification is applied by the Nemesida AI MLA module, which will analyze requests for compliance him.
When clicking on ![]() you can edit specification’s name.
you can edit specification’s name.
When clicking on ![]() the specification file is being downloaded to the local computer.
the specification file is being downloaded to the local computer.
Button ![]() allows you to delete the specification. To remove individual elements from the specification, select the appropriate elements and click
allows you to delete the specification. To remove individual elements from the specification, select the appropriate elements and click ![]()
After adding the specification, you can view it for each URL by clicking on it.
If it is necessary to sort the specifications by method, select the appropriate method from the suggested list 
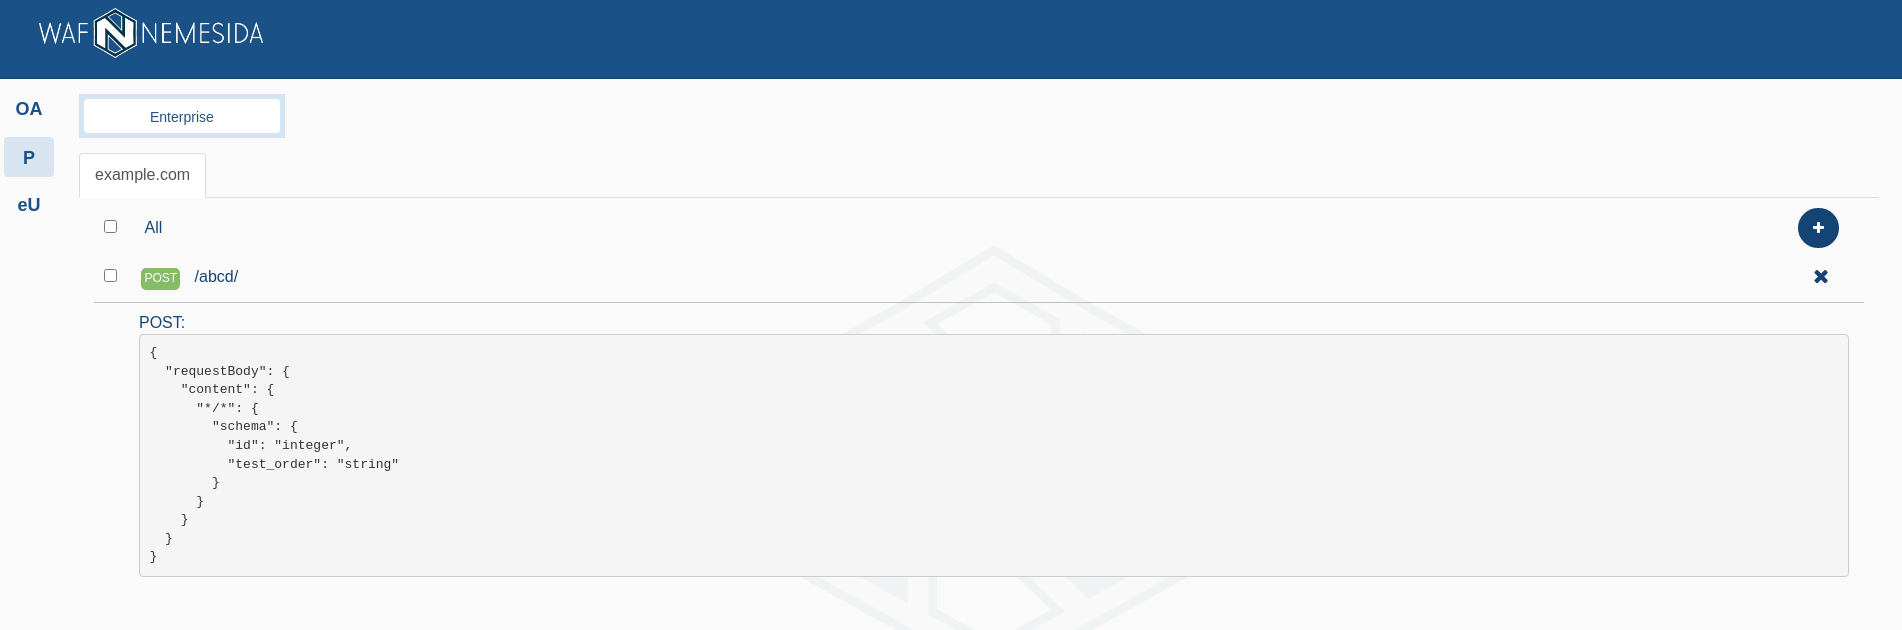
Specification Setup
Tab ![]() allows you to add a specification for URLs that are generated by the Nemesida AI MLC module during request analysis. To start the analysis process, you need to add virtual hosts in the section Nemesida AI MLC settings. To combine with existing specification, you can select several elements (or all) and click on
allows you to add a specification for URLs that are generated by the Nemesida AI MLC module during request analysis. To start the analysis process, you need to add virtual hosts in the section Nemesida AI MLC settings. To combine with existing specification, you can select several elements (or all) and click on ![]() . After that, the URLs (paths) will be added to the existing specification or a new one will be created, if there is no one for the virtual host.
. After that, the URLs (paths) will be added to the existing specification or a new one will be created, if there is no one for the virtual host.
When you click ![]() it will be possible to delete/exclude the URL. In case of an exception, the URL will not be used in the future when creating the specification.
it will be possible to delete/exclude the URL. In case of an exception, the URL will not be used in the future when creating the specification.
URL Exclude
When clicking on ![]() a list of URLs excluded from the analysis by the Nemesida AI MLC module opens. Excluded URLs will not participate in creating a request specification in the OpenAPI format.
a list of URLs excluded from the analysis by the Nemesida AI MLC module opens. Excluded URLs will not participate in creating a request specification in the OpenAPI format.
- added a license key with the Business or Enterprise plan in the user settings;
- the functionality is activated by the administrator.
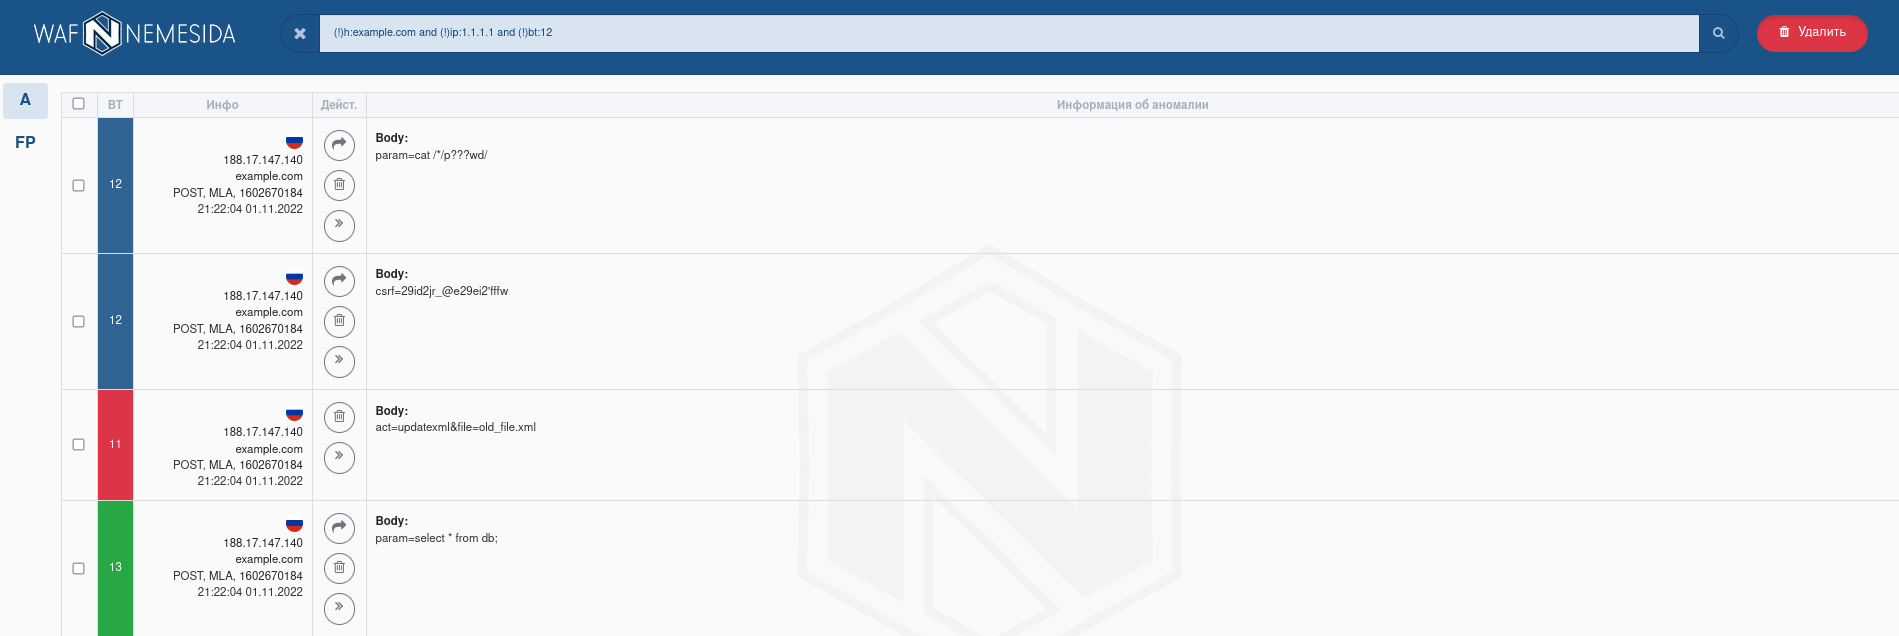
All events from Nemesida AI are rendered on the main page («Attack») for the next processing. The main page displays events received via the Nemesida WAF API from the machine learning module, of the following type:
| Situation | Solution |
| After additional analysis, Nemesida AI unblocked the request, identified by signature analysis as an attack. | The incident record can be deleted by click |
| After additional analysis, Nemesida AI unblocked the request with the attack. | In this case, it implies the presence in the request of attack features that do not fall under the condition of unconditional blocking by signature analysis (score equals 12), but sufficient for sending for additional analysis by machine learning.
If requests with clear signs of attack are unblocked by Nemesida AI, this means that the behavioral model is not trained accurately enough and that it is necessary to retrain the model. It is recommended to create a blocking rule for the time of training, using the Personal blocking rules. |
| Situation | Solution | |
| The content of the zone has signs of an attack. | The incident record can be deleted by click |
|
| The contents of the zone show no signs of attack. | The request is evaluated as «False Positive» and is exported completely. To export a request, click the It can be executed when the content of the request contains no signs of an attack. |
|
| The request is treated as «False Positive» and is exported with editing the content of the zone where the anomaly is detected.
Applies in cases where the zone content contains dynamic data. Example: csrf=29id2jr_@e29ei2fffw To export with editing the contents of a zone, click the |
||
| Situation | Solution | |
| The content of the zone has signs of an attack. | The incident record can be deleted by click |
|
| The contents of the zone has not signs of attack. | The request is evaluated as «False Positive» and is exported completely. To export a request, click the It can be executed when the content of the request contains no signs of an attack. |
|
| The request is treated as «False Positive» and is exported with editing the content of the zone where the anomaly is detected.
Applies in cases where the zone content contains dynamic data. Example: csrf=29id2jr_@e29ei2fffw To export with editing the contents of a zone, click the |
||
Events of type BT 11 and BT 13 are not passed to the Nemesida AI MLC module.
Exported «False Positive» requests will be considered by Nemesida AI as an example of a legitimate request.
When retraining the behavioral model (after the retraining process is completed), it is recommended to delete the exported “False Positive” queries to reduce the load on the Nemesida AI module and reduce the processing time of the request by the machine learning module.
The search field is available for requests’ filtering. It allows to select requests using occurrence of word(s) and using special operators.
 |
Delete of the tagged records. |
| Request export into the table. | |
| Delete marked request. | |
| Request contain editing with next export into the table. | |
| Display of extended information about the request. | |
| Checking the request using signature method. |
- added a license key with the Enterprise plan in user settings;
- the functionality is activated by the administrator;
- the address of the connection to the Nemesida WAF API is specified in the parameter
API_URI(file/var/www/app/cabinet/settings.py).
By default, the data is loaded for the entire time, but a selection of events for a certain period is available at the top of the page. A selection of event display criteria is also available. Sorting of events is available according to the following criteria:
When you click on ![]() , a report in
, a report in CSV format will be created. To delete records, select several (or all) records and click on ![]() .
.
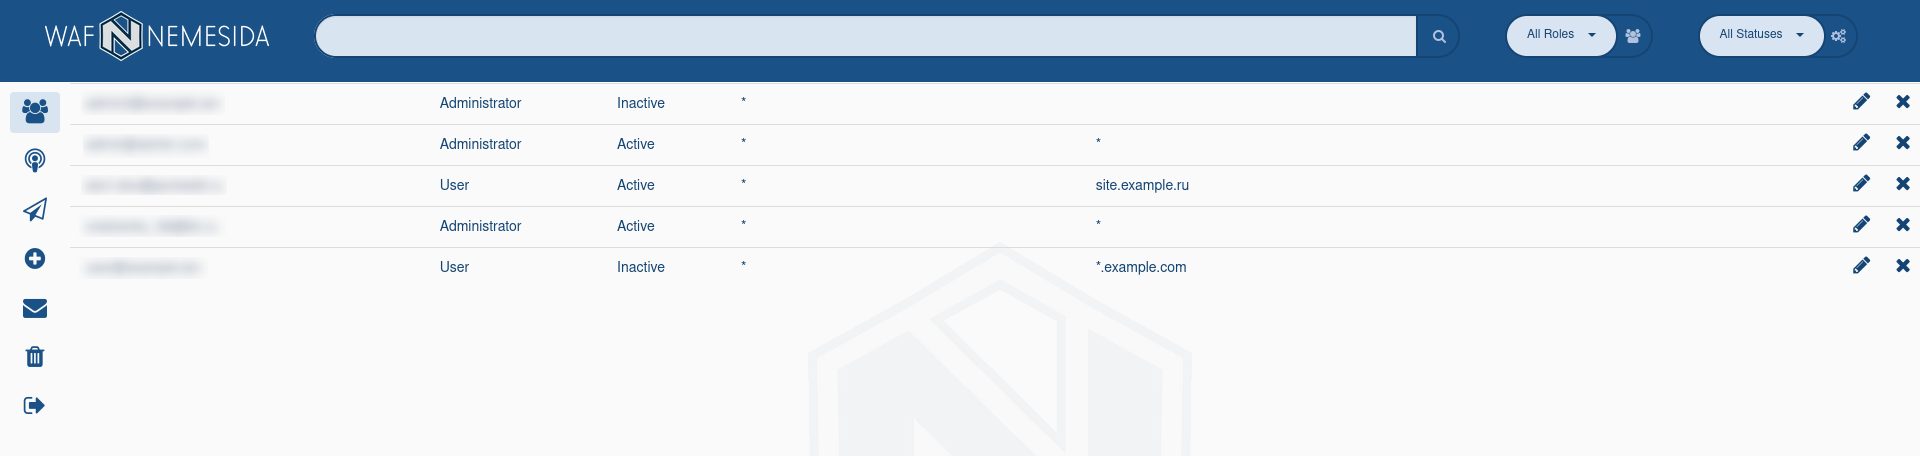
List of the users
The tab ![]() contains a list of all users. When you click on the icon
contains a list of all users. When you click on the icon ![]() the user is being deleted. When you click on the icon
the user is being deleted. When you click on the icon ![]() the user editing window opens.
the user editing window opens.
Vulnerability Scanner
In the admin panel, the tab ![]() displays requests that the administrator has excluded from the list of vulnerabilities.
displays requests that the administrator has excluded from the list of vulnerabilities.
List of all applications for unlocking requests
The ![]() tab displays a list of applications for unlocking requests. When you click on
tab displays a list of applications for unlocking requests. When you click on ![]() , the request is deleted.
, the request is deleted.
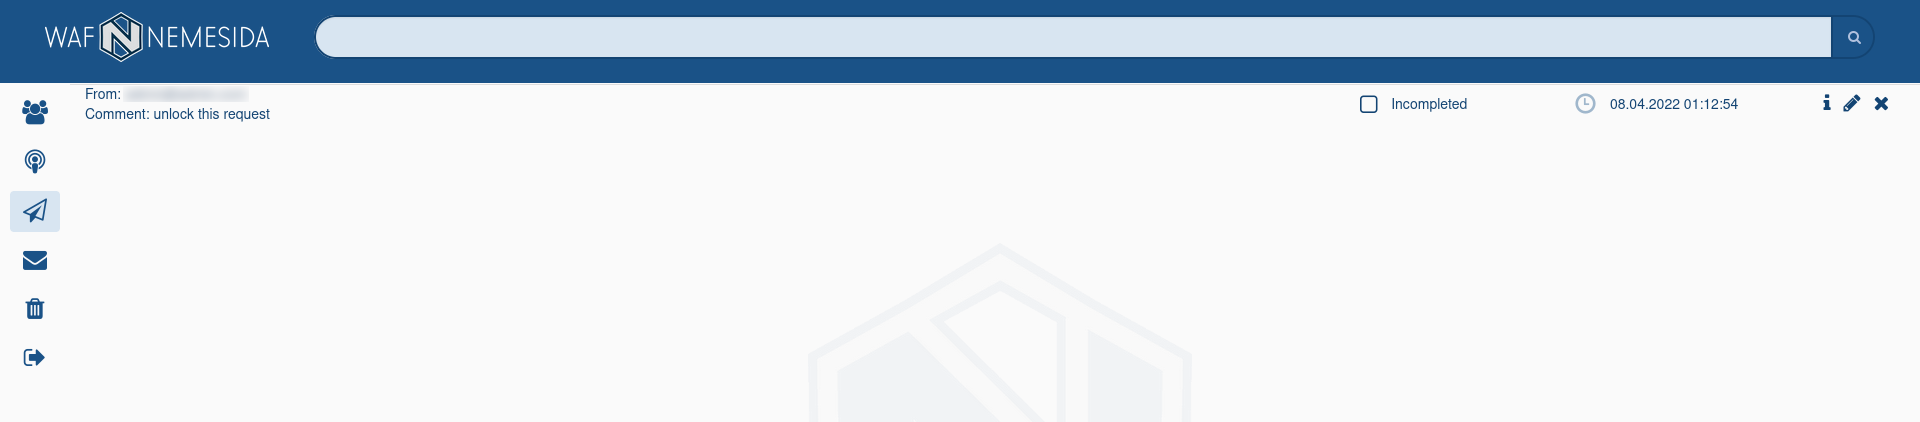
Administrator can edit the request by clicking on ![]() .
.

Add new user
The tab ![]() contains window for adding a new user.
contains window for adding a new user.
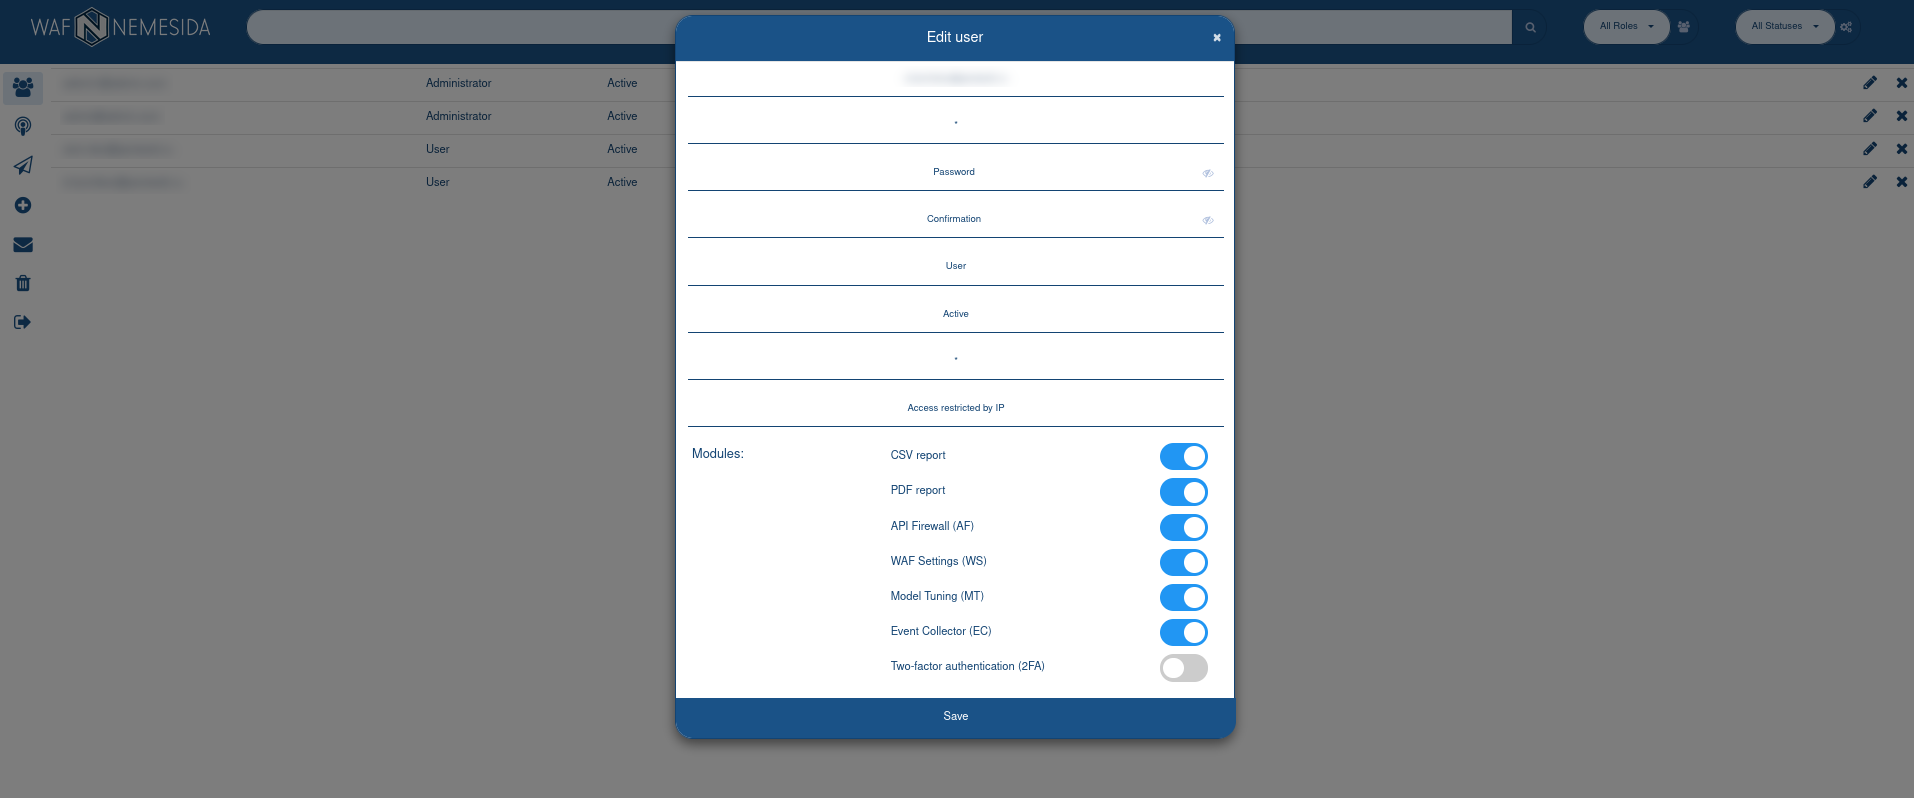
To add a new user, fill in the following fields:
E-mail address
Module ID of Nemesida WAF. You can set multiple WAF ID separated by a comma. The «*» value means that all possible WAF ID are specified.
Password
Confirm password
User role: User or Administrator (with rights to create and edit other users).
User status: enabled (Active) or disabled (Inactive).
Filtering attacks by domain. You can set multiple domains separated by comma. The «*» value means that all domains will be used.
If you set a specific domain, the user will only see the attacks that came to this domain in their Nemesida WAF Cabinet.
In this field one can set wildcard values similar to Nginx. For example, the domain name .example.com includes the main domain and its subdomains. Domain name *.example.com includes subdomains, but does not include the main domain example.com.
The IP address which the user can use to log in to the Nemesida WAF Cabinet on the admin panel. You can set multiple addresses separated by comma.
CSV and PDF formats, as well as access to the functionality for managing WAF settings, API Firewall and model settings.
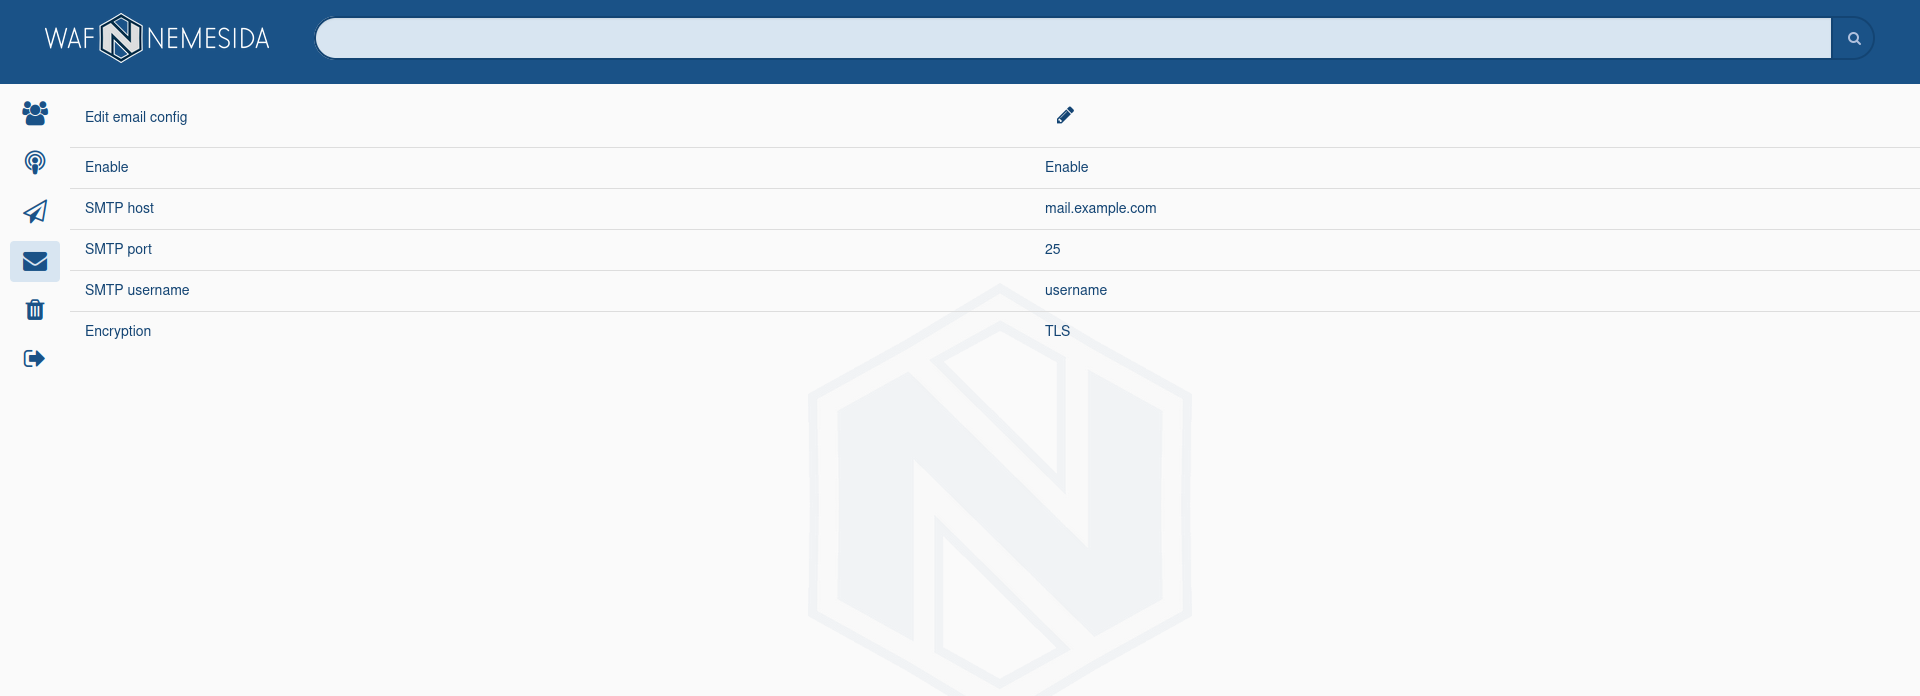
Configuring the mail server
In the tab ![]() the administrator can configure the connection to the mail server to send email attack alerts.
the administrator can configure the connection to the mail server to send email attack alerts.
When clicking on the icon ![]() the administrator can edit the settings.
the administrator can edit the settings.
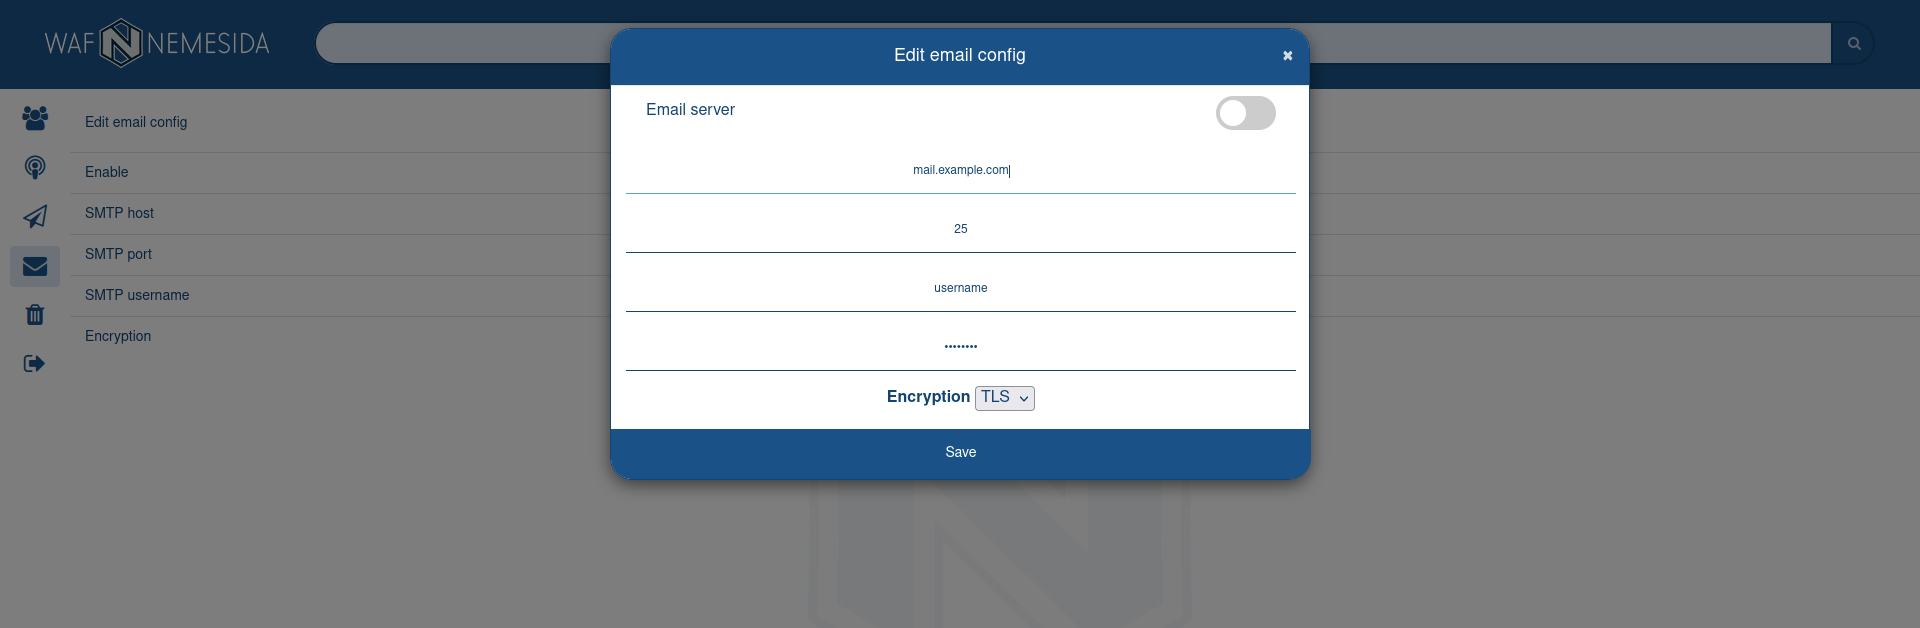
To configure the mail server, you need to fill in the following fields:
Activate/deactivate the sending of attack alerts using the mail server.
The address of the mail server.
The port of the mail server.
SMTP password
The username and password on behalf of which notifications will be sent.
Encryption method. The following methods are available: No, SSL, TLS.
Removing attacks
In the tab ![]() the administrator can configure automatic removal of attacks from the Nemesida WAF Cabinet. When deleting attacks from your Nemesida WAF Cabinet, information about them will also be deleted from the database.
the administrator can configure automatic removal of attacks from the Nemesida WAF Cabinet. When deleting attacks from your Nemesida WAF Cabinet, information about them will also be deleted from the database.

When clicking on the icon  the administrator can add a new task to the list.
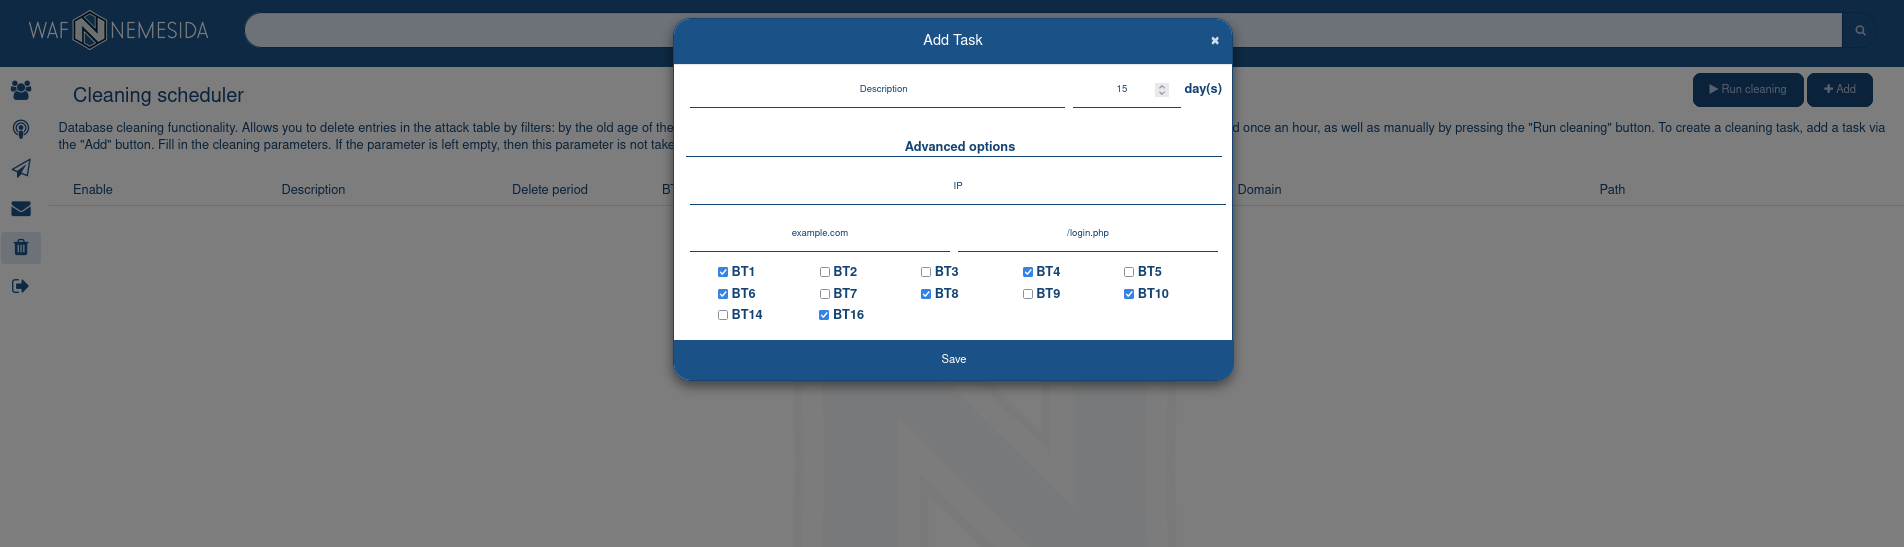
To add a task, you need to fill in the following fields:
The period (in days) during which attack records older than this period will be deleted.
If you set the time interval 0 days, then the task will be deleted all attacks, if you do not set additional options: BT, IP, Domain, URL.
example.com, .example.com, *.example.com, *.
/index.php attacks will be removed if the exact match of the string /index.php.
When clicking on the icon ![]() the administrator can edit the task settings, and when clicking on
the administrator can edit the task settings, and when clicking on ![]() it is being deleted.
it is being deleted.
Tasks created by the administrator will be triggered according to the schedule every 60 minutes. When clicking on the icon  active tasks will be forced to run outside the schedule.